Behavior trees
Behavior trees (BT) are the main specification model at Intrinsic. They can be used to modify control flow according to a solution's requirements.
Control flow is encoded in nodes based on relation. Data flow is modeled by means of a blackboard, an internal key-value store with available prototypes.
Behavior trees are triggered from the executive when calling executive.run(). This
interprets the tree and executes nodes according to their
semantics. For Task nodes, in which the
call_behavior field has been set, the skill is invoked with specified
parameters. Skills are the only component which instructs/controls equipment
(Resources). You can view the live progress of a behavior tree in the on-prem frontend.
Conditions and decorators
Conditions are any expression that evaluates to a boolean. These can be constructed in a variety of ways and can be based on data created during runtime, or can be the outcome of a specific sub tree.
There are two cases for conditions:
- As decorators attached to any node
- As conditions used in the loop node and the branch node
Decorators can be added to any node and modify the control flow.
You can define conditions in three different ways:
- Subtree conditions
- Blackboard expressions
- Compound conditions
Subtree conditions
You can specify any subtree to be executed as a condition. An example on how to achieve this using the Python API is as follows:
condition = BT.SubTreeCondition(estimate_connector)
Assuming you have a node called estimate_connector, which invokes an
estimate_pose skill to detect a connector, the condition will evaluate to
True if the connector can be found. It will render as False if the skill fails.
Blackboard expressions
You can define conditions based on data computed during runtime. This data is stored on the blackboard and contains protos that are mapped to a key. The Common Expression Language (CEL) allows you to write boolean expressions over these protos.
An example of blackboard conditions using the Python API is as follows:
condition_always_fail = BT.Blackboard('false')
# Expects a key on the Blackboard called 'has_failed', indicating whether something has failed
condition_bool = BT.Blackboard('has_failed')
# Expects a key on the Blackboard called 'estimate_pose_result' containing a score
condition_bool = BT.Blackboard('estimate_pose_result.score > 0.75')
You can create simple conditions which simply evaluate to True or False as shown in the example, or simply refer to a boolean value available on the blackboard.
Additionally, you can write more complex expressions utilizing anything available
within CEL.
Compound conditions
If your condition requires something more complex, you can combine conditions by using compound conditions. This includes:
all_of: Takes a list of conditions, all of which must be satisfied to satisfy theall_of. If the conditions list is empty,all_ofevaluates toTrue.any_of: Evaluates toTrueas soon as any of the given conditions evaluate toTrue. If the conditions list is empty,any_ofevaluates toFalse.not: Evaluates toTrueif the given condition evaluates toFalse.
All of
# Always evaluates to true
always_true = BT.AllOf(conditions=[])
# Combine multiple conditions
condition_all = BT.AllOf(conditions=[BT.SubTreeCondition(estimate_pose),
                                     BT.SubTreeCondition(estimate_pose_block)])
Any of
# Always evaluates to false
always_false = BT.AnyOf(conditions=[])
# Combine multiple conditions
condition_any = BT.AnyOf(conditions=[BT.SubTreeCondition(estimate_pose_connector),
                                     BT.SubTreeCondition(estimate_pose_block)])
Not
# Enables e.g. failure handling
BT.Not(condition=BT.SubTreeCondition(tree=estimate_pose))
Decorators
Decorators are properties which can be assigned to any node. Currently, only Condition decorators
are supported, which influences whether a node can be executed or is prone to immediate failure.
You can add a decorator to any node using set_decorators:
node.set_decorators(BT.Decorators(BT.Not(condition=BT.SubTreeCondition(tree=estimate_pose))))
Control flow
Control flow explains how various node types transition through their
lifecycle from being accepted to ending in a final state of Success or
Failure. The specific execution semantics for each node type are described in
their corresponding sections.
Every node follows the same general transition graph:
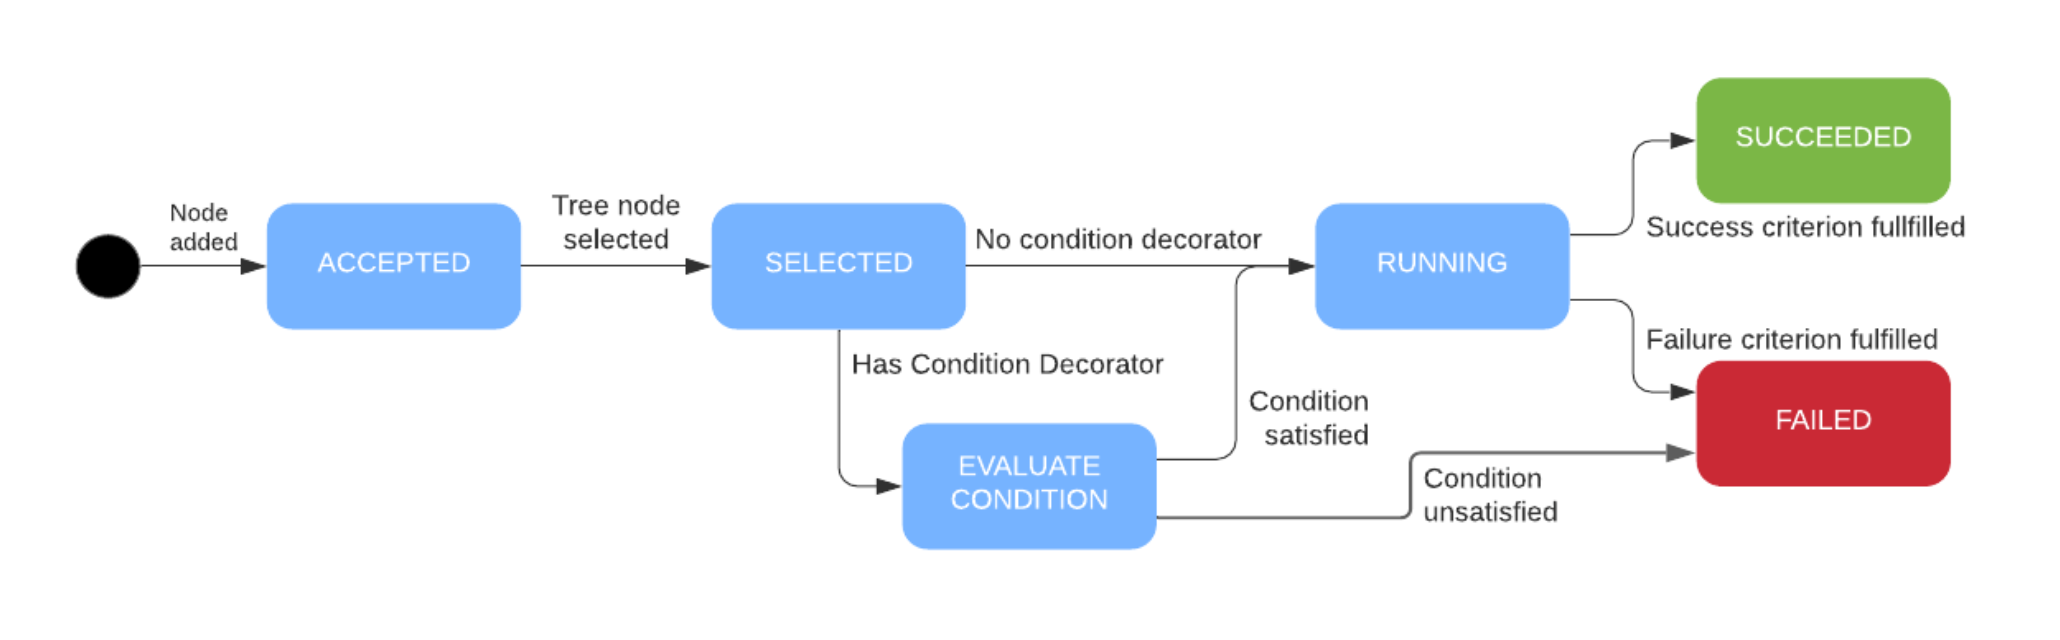
After a node is added, it will immediately transition to Accepted, which
is the prerequisite for being executed. The next state the node will transition
to is Selected; the timing of the transition depends on the node type and
the current state of the execution. For example, in a sequence node, a new child
node transitions to Selected once the previous child node has finished
successfully.
Conditions can be added to all nodes to control their execution. This condition,
if present, will be evaluated once the node transitions to selected. If the
condition fails, the whole node will transition to Failed as well.
If it succeeds, the node will transition to Running and start executing. This will eventually lead the node to be fully Succeeded or become a Failure if an error happens during execution.
Data Flow
There are two ways in which data flow can be expressed, including when:
-
Skills directly update the world as a result of their execution. This happens, for example, when a skill moves a robot. After the move, the position of the robot is updated in the world.
-
Skills return a value. This computed data is consumed by other skills within the same solution. Return values are represented as entries on the
blackboard, which allows an exchange of arbitrary values during execution.
If a skill is executed multiple times, the value will be overwritten. However,
skills of the same type have distinct blackboard keys, so executing two skills
of the same type after one another will result in two distinct entries on the
blackboard.
Currently, there are two sources of information for the blackboard:
- Skills via their return values
- Loop/retry counters
In order to scope the data the blackboard is cleared once the execution starts, data cannot be communicated between runs. Blackboard data is cleared on execution start rather than stop to facilitate debugging by inspecting the values written on the blackboard. This holds for the general values while the loop/retry counters are only available within the corresponding nodes.
Return values
Skills can compute results and these results will be stored on the blackboard
described above. These results can be arbitrary protos. The key on the
blackboard is computed when the skill is instantiated. You can access the
return value of any skill by invoking .result on it. This will create a
wrapper object around the return value, as it may not be available at the time.
You can use tab-completion on the wrapper object to inspect the type of the
return value.
If you want to use a return value as a parameter you can simply provide
skill.result as a parameter.
result_provider = skills.dio_read_input()
result_consumer = skills.enable_motion(clear_faults=result_provider.result[0])

executive.run([result_provider, result_consumer])
In the example above we instantiated one skill which will act as result_provider
and then instantiate another skill which uses result_provider.result.timeout
as a parameter.
If you want to inspect the value available on the blackboard after execution you
can use the API available at the executive.
# You can wait for a value to be available before accessing it
executive.await_value(estimate_pose.result)
# This will be true because of the use of await_value
if (executive.is_available(estimate_pose.result)):
  object_pose_z = execution.get_value(estimate_pose.result.pose.z)
Loop/Retry Counters
The Loop node and the Retry node both write their corresponding counters to the blackboard while their child nodes are running.
You can access them by using loop_node.loop_counter or
retry_node.retry_counter respectively.