Use ROS with your solution
When developing and running Intrinsic solutions on real hardware on premises, it can be valuable to visualize, log, and manipulate various types of data locally with minimal latency.
The Robot Operating System (ROS) is a set of open-source software libraries and tools that are commonly used by robotics developers. These tools may be familiar to those who have used them in their career or coursework, and provide a valuable way to introspect an Intrinsic workcell.
This guide shows you how to install ROS tooling on a user device and use it to visualize data coming from a configured workcell.
System overview
ROS is packaged and released as distributions, also referred to as "distros". Each distro is supported for a fixed length of time (its support window), and usually support windows overlap so that more than one distro is supported at once. For this guide, we recommend ROS Jazzy as the distro of choice, as it has the newest supported feature set. While older or newer distros may work, there may be incompatibilities that will fall outside of the scope of this guide.
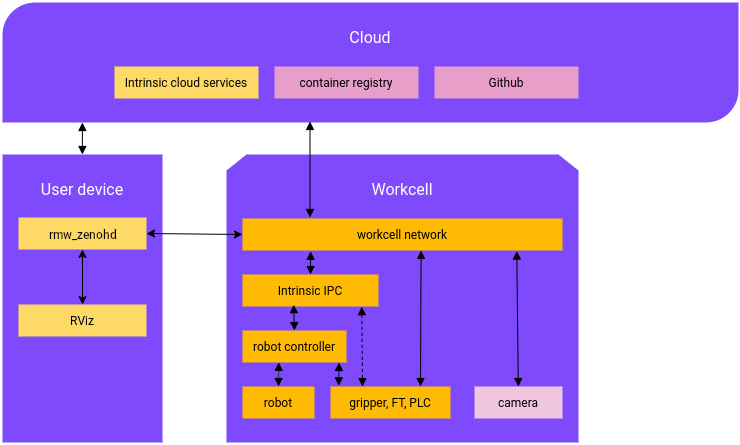
The Intrinsic platform exposes select streams of real-time diagnostic data via the Zenoh communications framework. With the use of the Flowstate ROS bridge, these streams of data can be viewed with ROS tooling such as RViz.
While both the Intrinsic-approved Industrial PC (IPC) and the user device maintain connectivity to the Intrinsic cloud platform, the ROS data flows directly from the IPC to the user device. This allows for low-latency visualization and debugging.
Prerequisites
The prerequisites for using ROS tooling with the Intrinsic platform include:
-
A compatible, configured robot workcell using the Intrinsic platform.
-
A robot that is supported by the Intrinsic platform
-
A workcell network with DHCP server for IPv4
-
An industrial PC configured with IntrinsicOS
-
-
A user device, such as a laptop or workstation running Windows or Linux
-
Physical access to the workcell network
-
A solution with a ROS Bridge service.
Step 1: Getting started
Before using ROS to visualize, you should first familiarize yourself with Flowstate and the Intrinsic stack. To do this, go through the steps in run on hardware. Briefly, these steps are outlined here:
- Aquire a Flowstate license and connect your Google Account
- Explore the tutorials section to get a deeper understanding of the capabilities of Flowstate
- Set up a Flowstate-enabled robotic workcell, including: 1. The physical robot 2. The workcell network 3. The Intrinsic industrial PC 4. Any additional automation equipment needed for your application
Step 2: Enable the Flowstate ROS Bridge
When creating a solution, ROS-based data streams will be off by default. To enable these data streams, the Flowstate ROS Bridge Service must be installed and configured as part of the solution. Follow these steps to set up the Flowstate ROS Bridge Service in your solution:
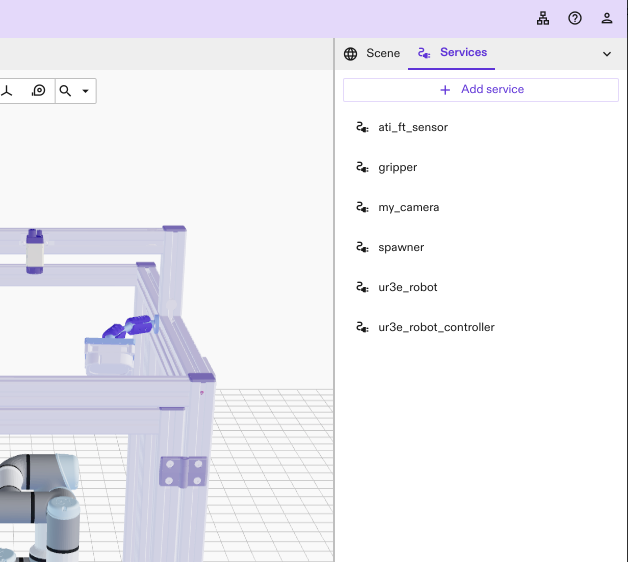
- In the Flowstate Editor, click on the Services tab to view the list of services in your solution
-
Click the Add Service button
-
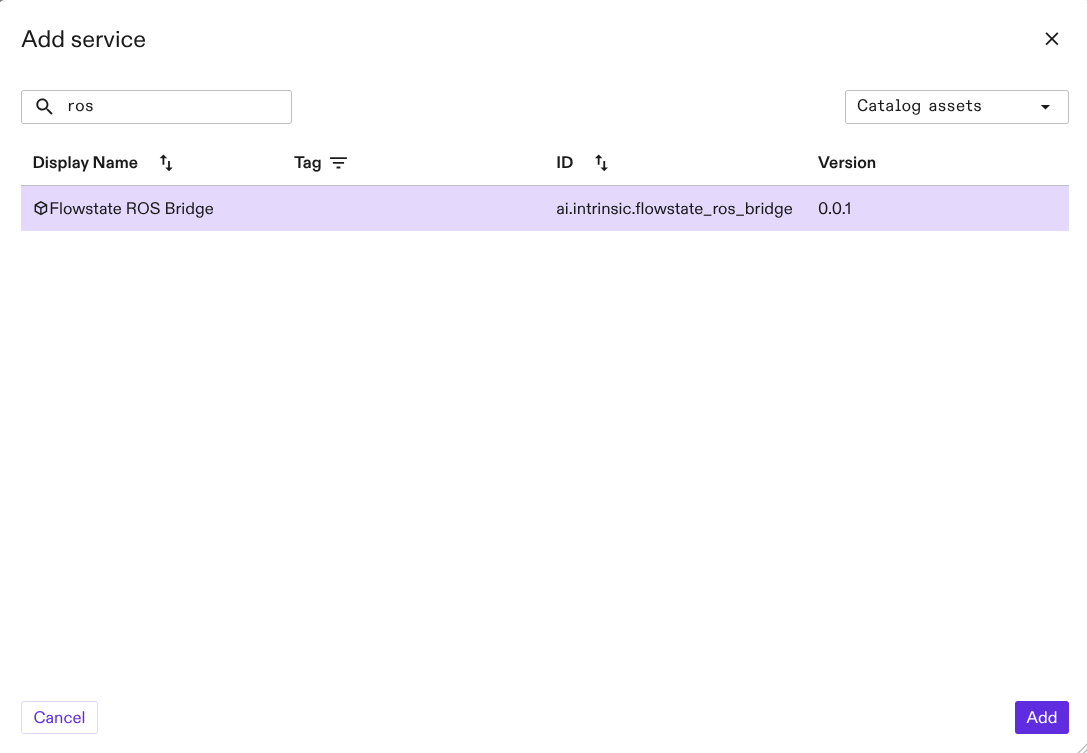
Use the search box to search the Catalog Assets for
ros, select Flowstate ROS Bridge from list, and click Add
- Configure the Flowstate ROS Bridge service:
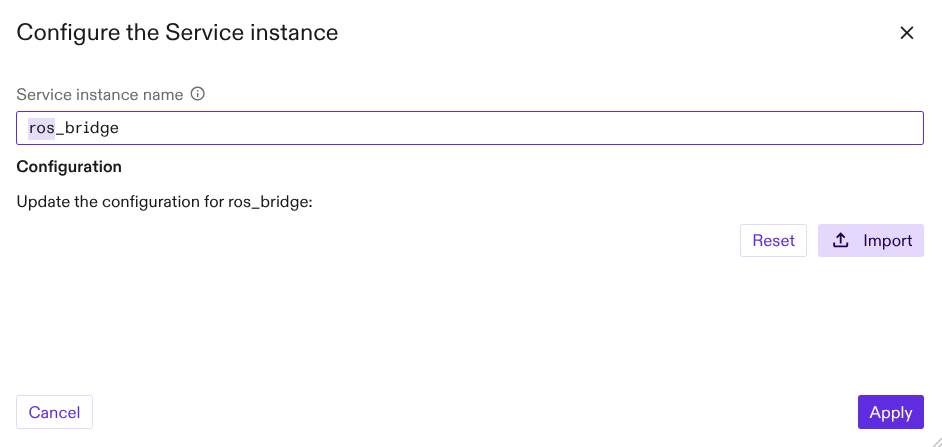
Give the Flowstate ROS Bridge service a name, such as ros_bridge
The default configuration is typically sufficient, so the configuration text area can be left empty.
- Click Apply
When the Flowstate ROS Bridge appears in the service list, it has been successfully installed in the solution.
Step 3: Installing ROS
To connect ROS to your Intrinsic robotic workcell, there must be a user device with ROS installed. For this, there are a few recommended avenues for obtaining a working ROS installation. You may select the best approach based on the constraints of your user system and information technology department policy.
For the best experience, we recommend installing Ubuntu Linux on the user system and installing ROS via the Debian Binary packages.
Option 1: Installing ROS via Debian Binary Packages
Get a system with Ubuntu 24.04 installed. Follow the Official ROS Jazzy Installation Instructions because it has the most up-to-date installation instructions.
Because the Flowstate ROS Bridge is a Zenoh-based system, ensure that the user system is using Zenoh as the ROS Middleware Implementation:
sudo apt install ros-jazzy-rmw-zenoh-cpp
export RMW_IMPLEMENTATION=rmw_zenoh_cpp
It is important to remember that this RMW_IMPLEMENTATION environment variable must be set on all terminals using the ROS tools with Flowstate.
We recommend setting this value in ~/.bashrc
Option 2: Installing ROS via Docker
Alternatively, if installing ROS on the client system is not possible or convenient, there are available Docker images that enable the use of ROS tooling from a container. Docker may be preferred in the case that the user system is not running Ubuntu 24.04, or is otherwise restricted from installing dependencies on a system level.
To simply run a ROS environment in Docker, start via:
docker run -it osrf/ros:jazzy-desktop /bin/bash
When running ROS in a docker container, there are a few considerations. In
order to communicate with the IPC, the container must
have full network connectivity, which requires host networking. This may be
set via the --net=host command line flag when starting a container.
Additionally, RViz requires access to the host X11 server and graphics cards.
One alternative for configuring the container correctly in a simple manner is to
utilize the Rocker tool. Rocker is available
to install on Ubuntu 24.04 via sudo apt install python3-rocker. On other
platforms, rocker is available via pip: pip install rocker.
With rocker installed, to get a full GUI-enabled ROS container with the Zenoh middleware selected:
rocker --user --home --x11 --device=/dev/dri/card0 --net=host --group-add=video --rmw zenoh -- osrf/ros:jazzy-desktop
Step 4: Connect the system to the workcell network
Once ROS is installed on the user computer, connect the user computer to the same network as the IPC, if it was not previously connected.
The most straightforward way of connecting a user computer to the same network is to physically connect to the same switch or router that the IPC is connected to. More complex network topologies are also possible, but out of the scope of this guide.
At this point, capture the IP address of the IPC to be used in future steps.
# Note that this will vary based on the configuration of your network.
export IPC_ADDRESS=192.168.1.15
Step 5: Connect the system to the IPC Zenoh Router
The simplest method to connect the ROS rmw_zenoh traffic on the IPC with the
user computer is to start a Zenoh router using the ROS rmw_zenoh package, and
point it to the IPC. There are many ways to do this. To get started, here
is an example of using an environment variable to adjust the default
Zenoh configuration, so that zenohd on the user computer will connect to
zenohd on the IPC.
If ROS is installed on the user computer using apt:
source /opt/ros/jazzy/setup.sh
export ZENOH_CONFIG_OVERRIDE='connect/endpoints=["tcp/$IPC_ADDRESS:17447"]'
ros2 run rmw_zenoh_cpp rmw_zenohd
If using Rocker, this lengthy one-liner will perform the same function:
rocker --net=host --rmw zenoh --env ZENOH_CONFIG_OVERRIDE='connect/endpoints=["tcp/$IPC_ADDRESS:17447"]' -- osrf/ros:jazzy-desktop ros2 run rmw_zenoh_cpp rmw_zenohd
The rmw_zenohd command must be left running in order to route the ROS messages to and from the IPC using Zenoh.
Step 6: Use ROS tools
Command line tools
The Flowstate ROS Bridge instance will appear as a normal ROS node:
$ ros2 node list
/flowstate_ros_bridge
Thanks to the linked Zenoh routers, the typical ros2 command line usage
behaves as expected:
$ ros2 topic echo --once /tf
transforms:
- header:
    stamp:
      sec: 1713902371
      nanosec: 511167120
    frame_id: root
  child_frame_id: grasp
  transform:
    translation:
      x: 0.31
  ...
The /tf topic will be publishing at a constant 50 Hz:
# Measure topic frequency
$ ros2 topic hz /tf
average rate: 50.402
	min: 0.001s max: 0.048s std dev: 0.01483s window: 51
average rate: 50.507
	min: 0.001s max: 0.049s std dev: 0.01507s window: 102
average rate: 50.223
	min: 0.001s max: 0.049s std dev: 0.01415s window: 152
average rate: 50.111
	min: 0.001s max: 0.049s std dev: 0.01229s window: 202


# Measure topic bandwidth
$ ros2 topic bw /tf
Subscribed to [/tf]
305.46 KB/s from 49 messages
	Message size mean: 6.12 KB min: 6.12 KB max: 6.12 KB
302.61 KB/s from 98 messages
	Message size mean: 6.12 KB min: 6.12 KB max: 6.12 KB
306.58 KB/s from 100 messages
	Message size mean: 6.12 KB min: 6.12 KB max: 6.12 KB
308.61 KB/s from 100 messages
	Message size mean: 6.12 KB min: 6.12 KB max: 6.12 KB
Use RViz
To start RViz to use with Flowstate:
source /opt/ros/jazzy/setup.bash
ros2 run rviz2 rviz2
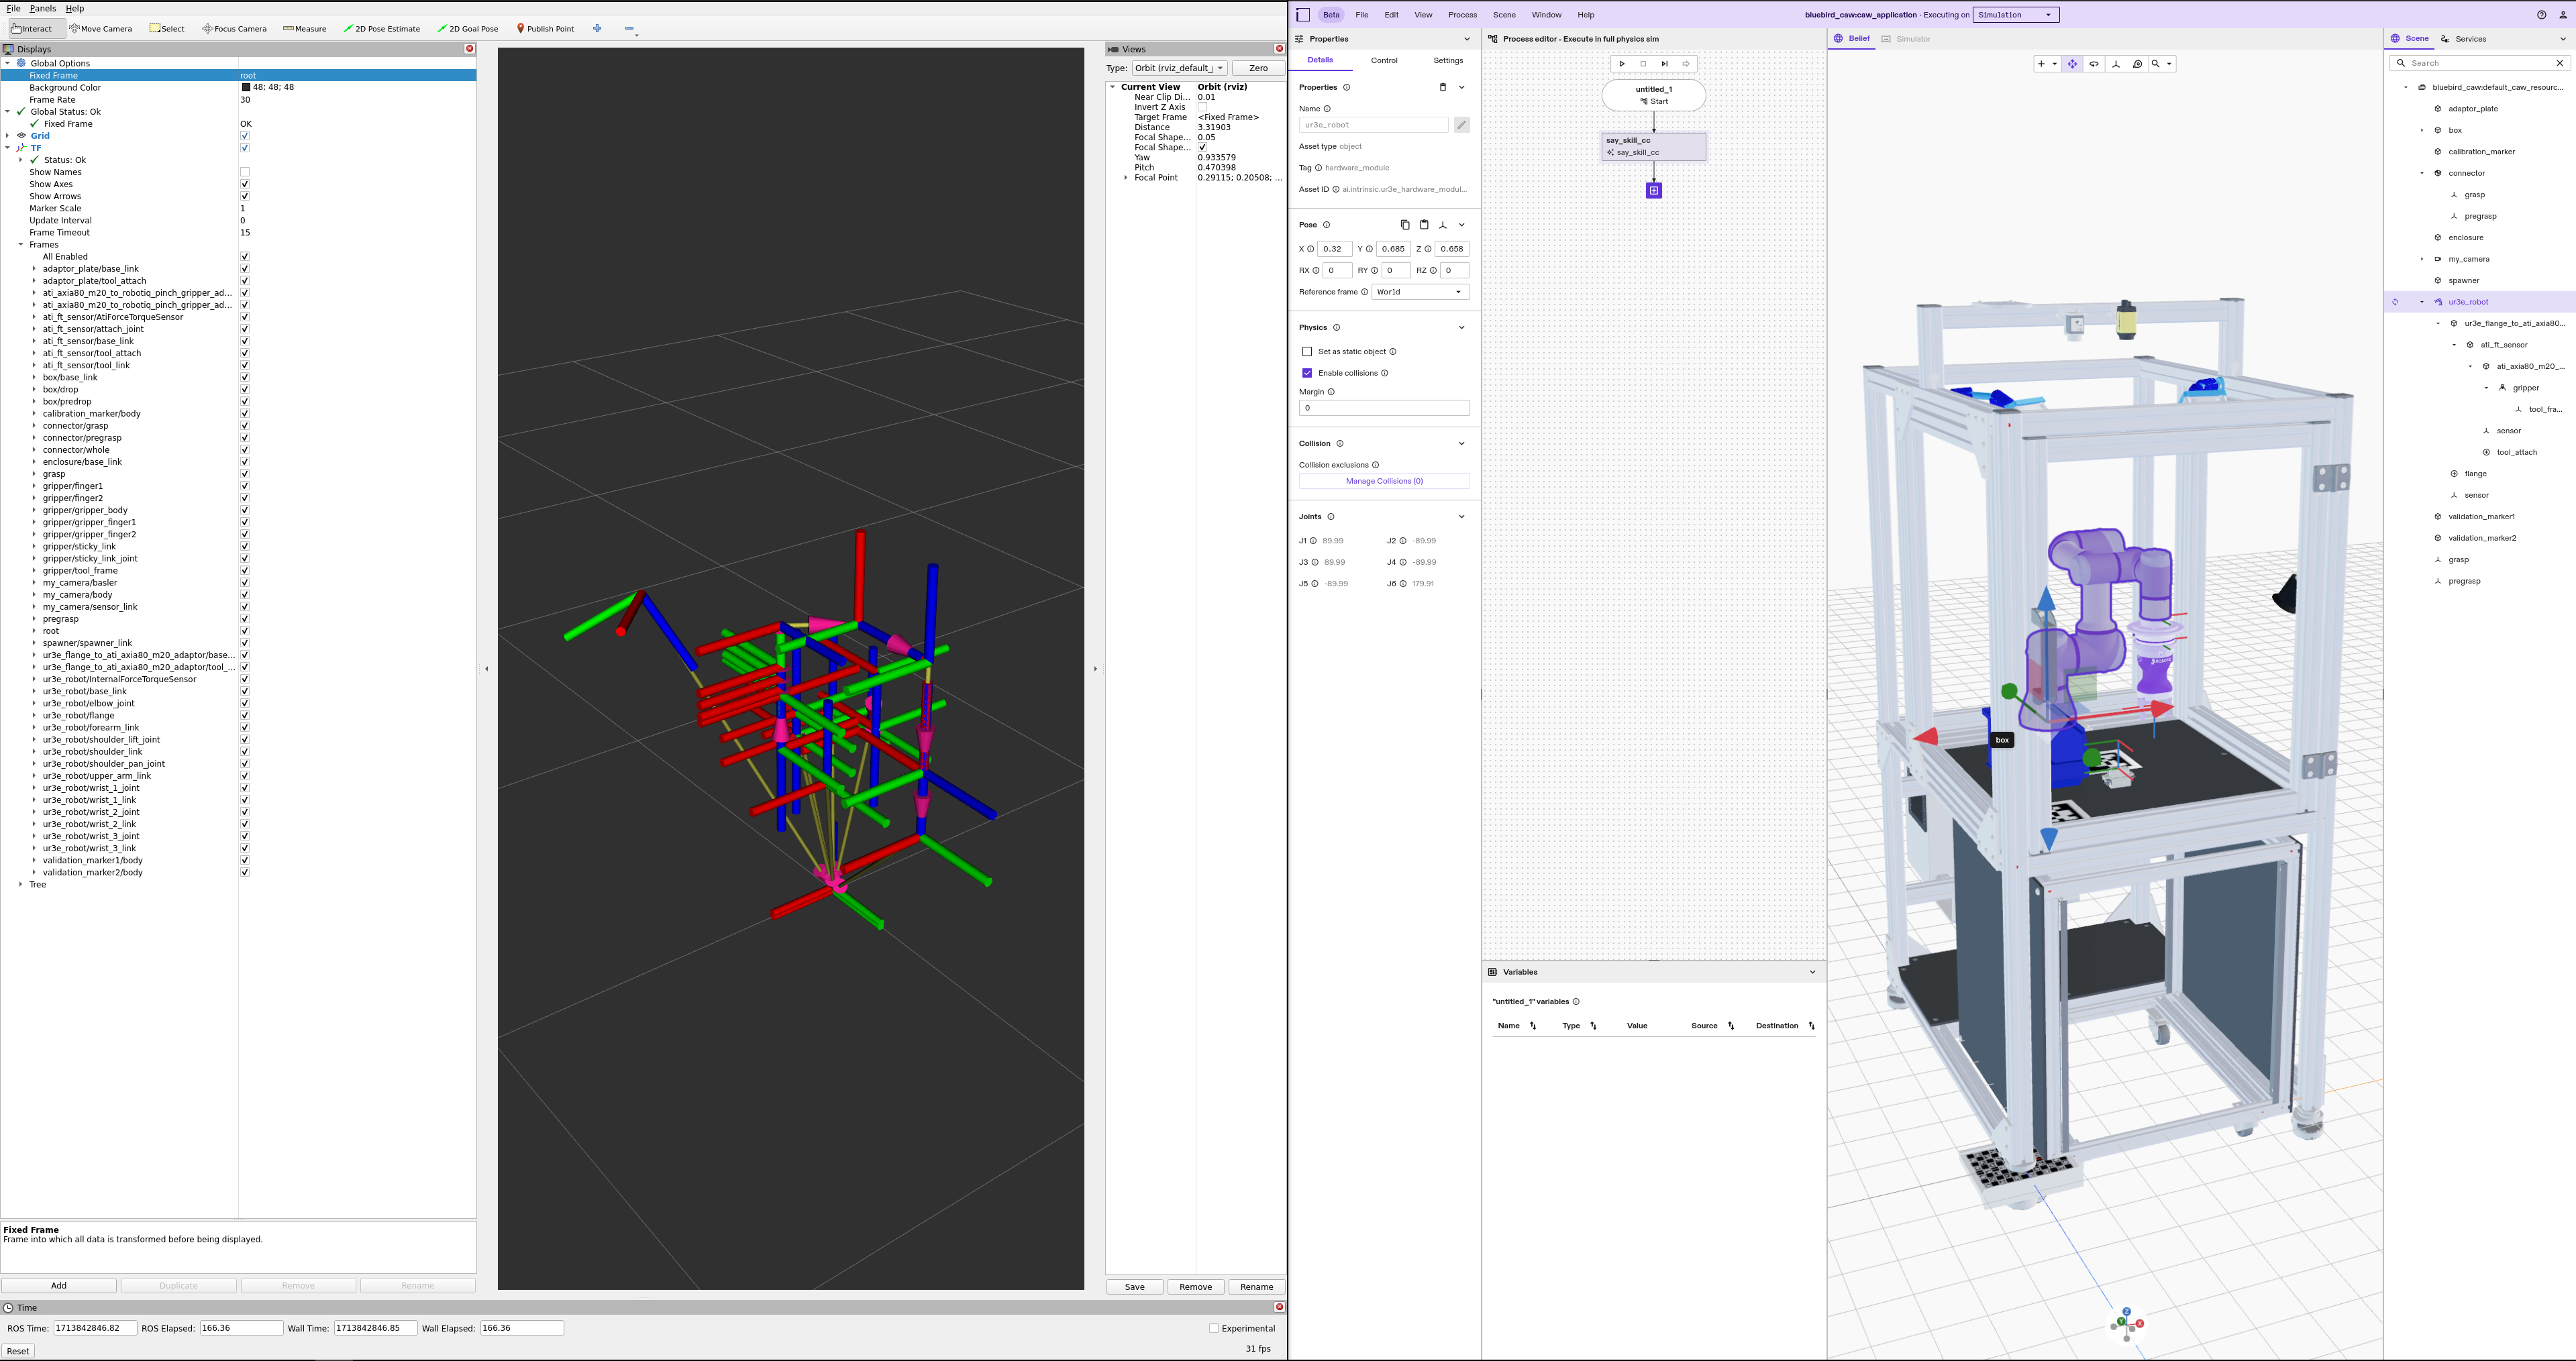
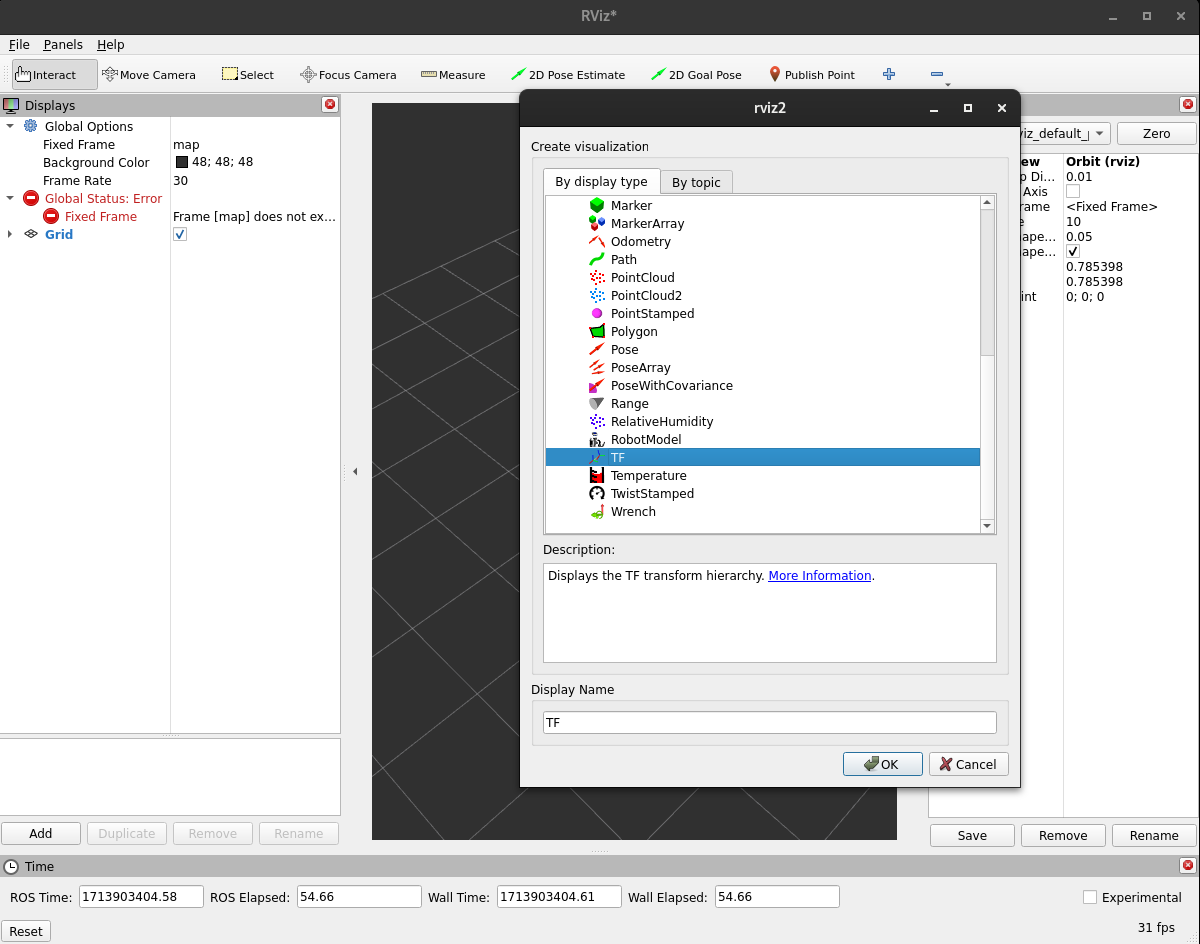
To visualize the transform tree in RViz:
- Add the TF tree display
- Click the Add button in the bottom of the Displays panel
- Scroll to select TF from the available displays
- Click OK
- Set the fixed coordinate frame to
/root- Under global options in the Displays panel, select Fixed frame
- In the drop-down menu, select
/root