Connect your IPC
The industrial PC (IPC) is equipped to connect to and transmit data between the Intrinsic stack and a physical robot workcell. This lets you begin automating processes with real-time motion controls from a virtual environment, or its digital twin, that is mirrored directly on the physical workcell.
Requirements
The Intrinsic IPC needs the following:
-
Mains power supply.
- Exception: The Spectra Tier 1 IPC uses a 24V, 120W DC power supply.
-
An ethernet uplink to a DHCP server and the internet.
-
The internet must be reachable on IPv4. IPv6-only networks are not supported.
-
If you need to configure a static IP in order to reach the internet, for example because a firewall exemption can only apply to a single IP, and this can't be provided by the DHCP server, talk to your Intrinsic customer solution engineer, or contact support. Alternatively, you can use a 4G or 5G modem with an ethernet port, or use a UniFi UDM Pro as a DHCP server.
-
If you need to configure a proxy, talk to your Intrinsic customer solution engineer, or contact support. You'll need to provide the details of the proxy: For an intercepting proxy, the root certificate, and for a forward proxy, the URL and credentials. They can help you set up a USB device that will provide this configuration to bootstrap the network connection.
-
If your network has a firewall, ensure it is correctly configured.
-
-
An ethernet robot connection.
- For example, this can connect to the ethernet port of the UR Control Box or the KUKA C4's X66 port.
-
Optionally, an EtherCAT connection.
- For example, this can connect to additional input and output terminals or a force-torque sensor.
-
For setup of newly-purchased IPCs, a display connection.
- Depending on the IPC model, you might be able to use VGA, HDMI, or DisplayPort. Depending on the BIOS configuration, you need to connect to either the mainboard display connector, normally on the left, or one of the GPU display connectors, normally on the right. Reboot after changing the connector because hotplugging may not work.
Network setup
The network setup depends on the requirements for the workcell as well as the factory network. This diagram shows one possibility:
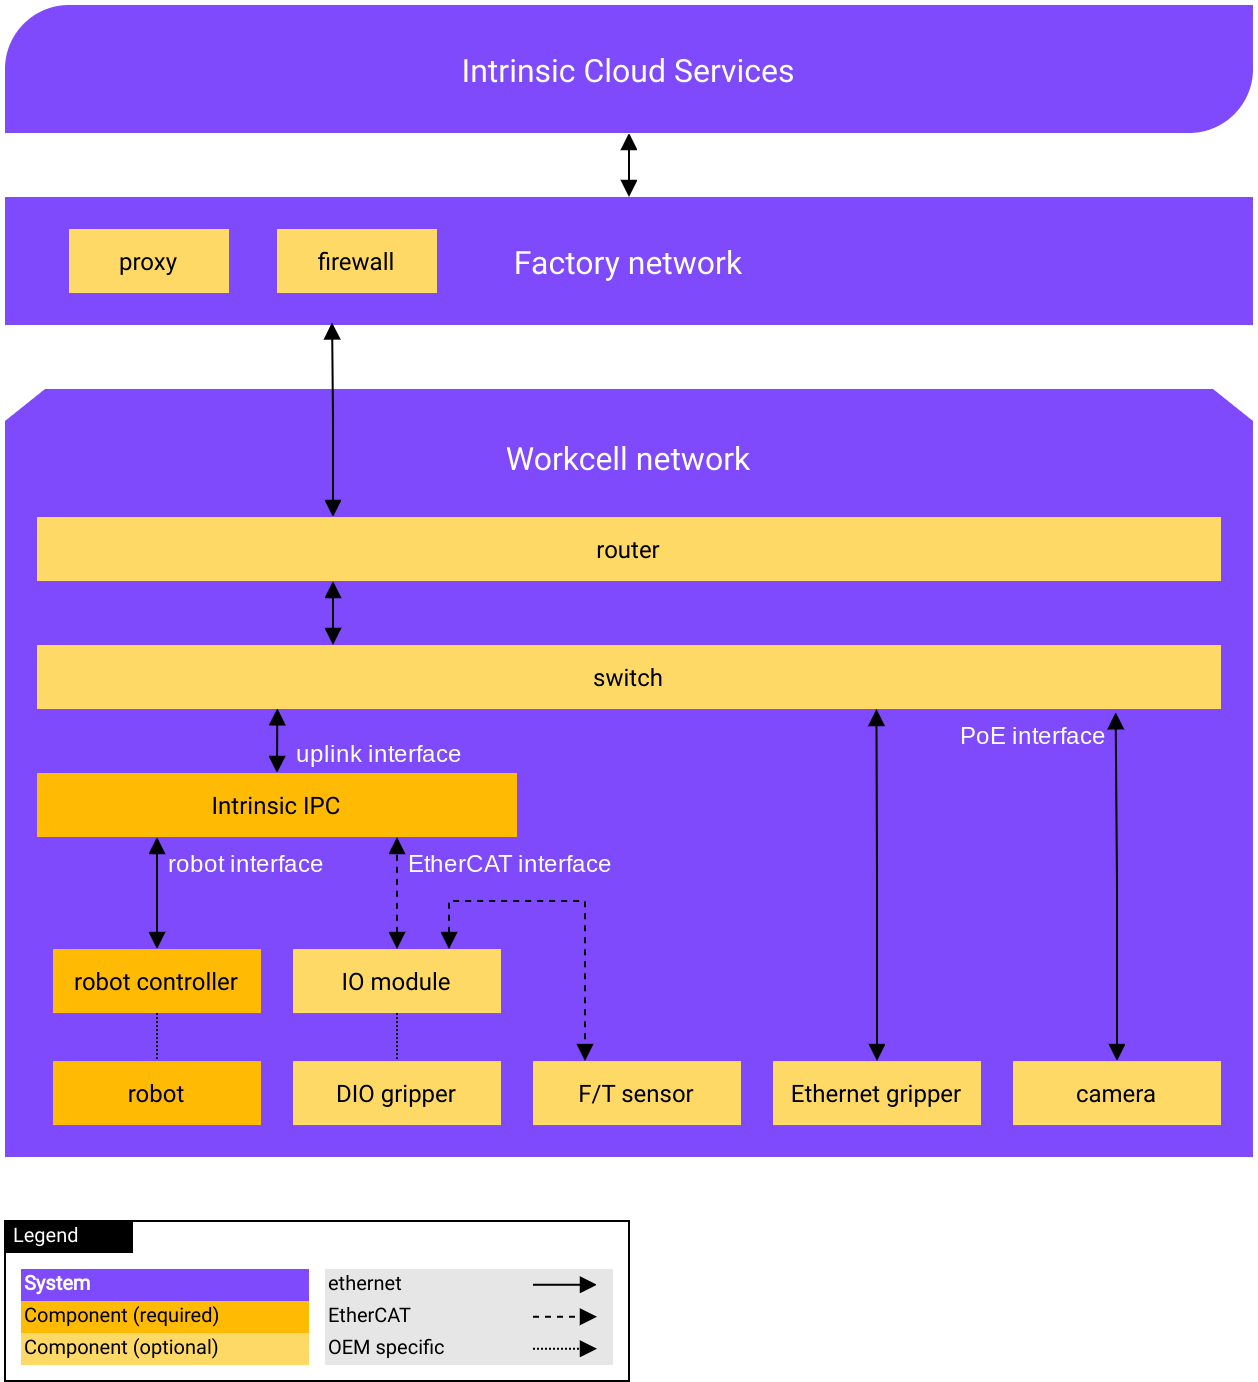
In the setup above, the following choices have been made:
-
A router and switch are placed between the IPC and the factory network. This makes it easy to manage or extend the workcell network, and a 5G-enabled router can provide internet connectivity when the factory network is unavailable.
-
The gripper is controlled by digital inputs/outputs (IOs), provided by an EtherCAT coupler and IO module such as the Beckhoff EK1100 and EL2008. This is useful when your gripper has no Ethernet control and your robot controller has no digital IOs.
The following diagram shows a simpler setup:
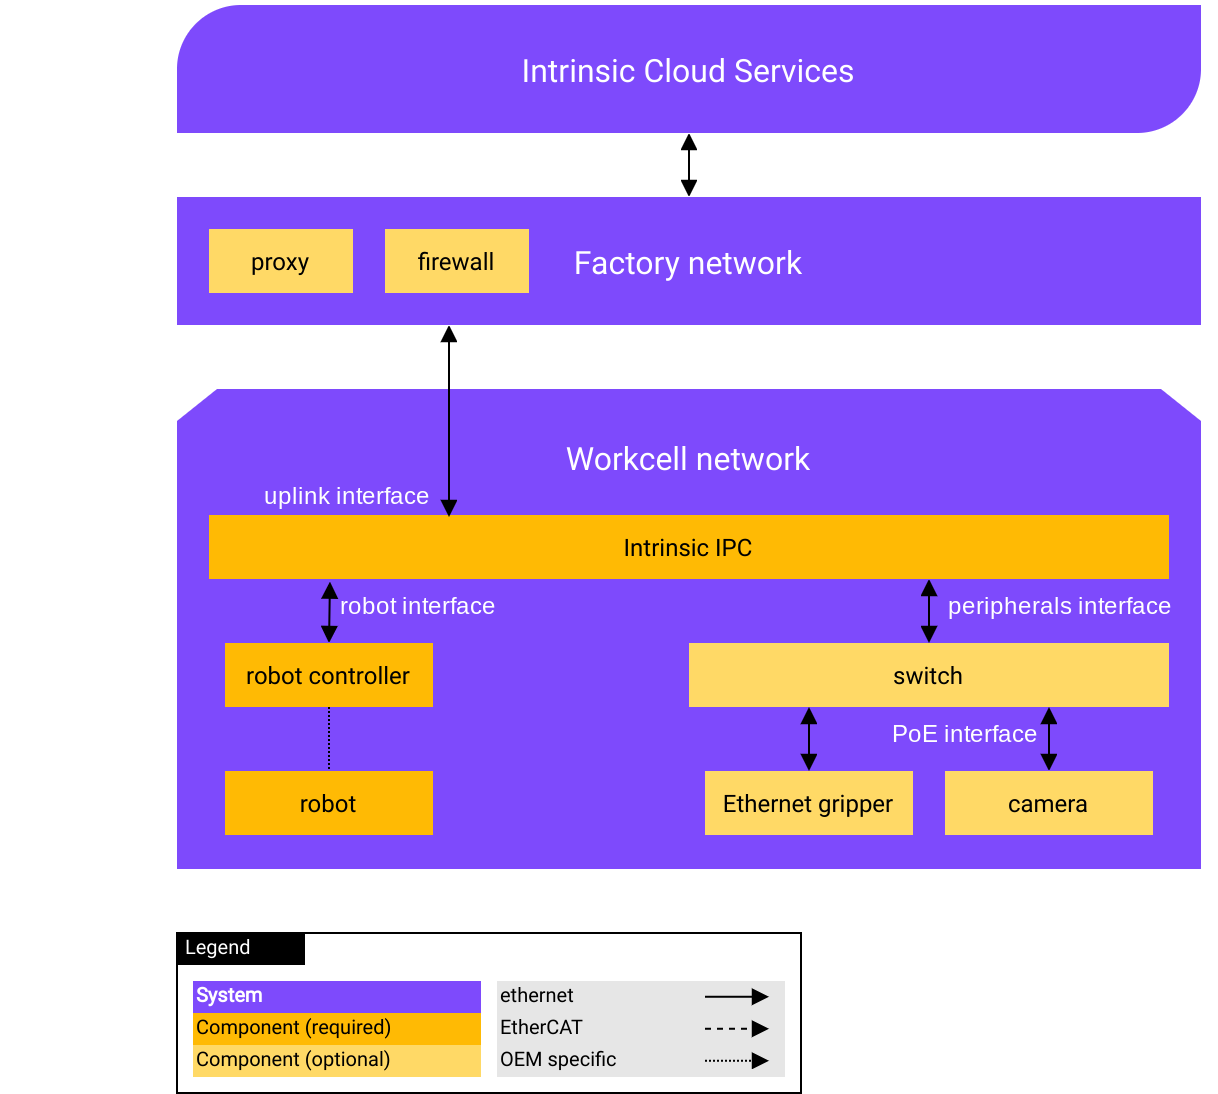
In the simpler setup above, the following choices have been made:
-
The switch is connected to a spare LAN interface on the IPC. This avoids the need for a router but has the following downsides:
-
You need to manually configure static IPs on peripherals connected to the switch (gripper and camera in the diagram above) as well as on the IPC's peripherals interface so that they can communicate.
-
You need to use an Advantech IPC, as the Spectra IPC doesn't have enough interfaces on the mainboard to connect to the internet, the robot, and a network switch for peripherals.
-
-
The gripper is connected to the same switch as the cameras, where it could be controlled with Modbus TCP, OPC UA, or another IP‑based protocol. This can be easier to set up but may be less reliable than using industrial Ethernet such as EtherCAT.
Make sure you have a suitable network to connect your IPC to.
To continue, select your configuration:
Tier 2 IPC from Advantech
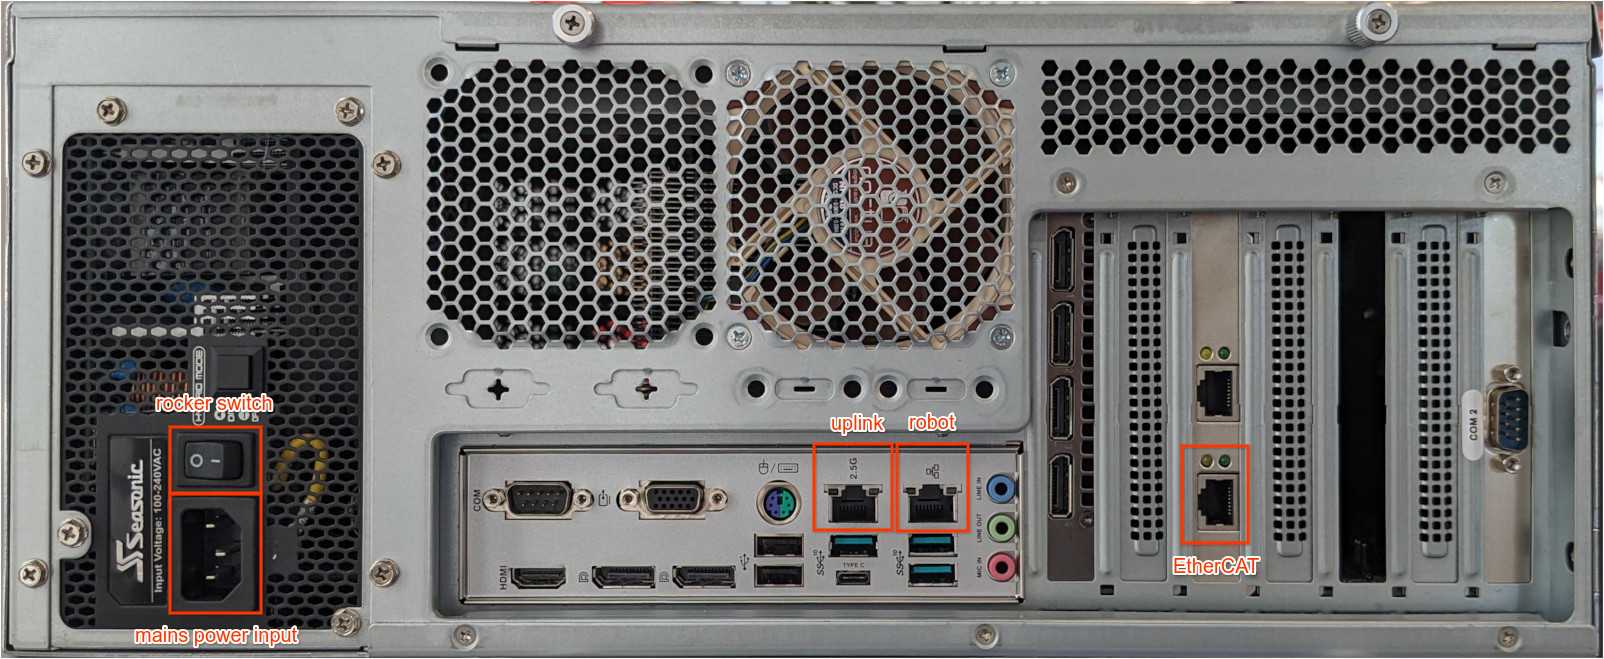
The back connectors of the Tier 2 IPC should be connected as follows:
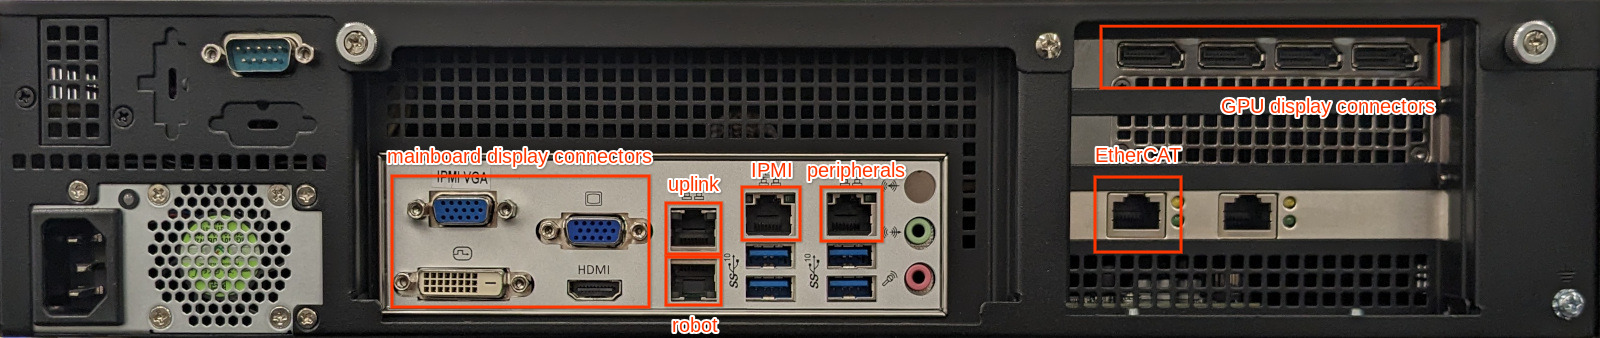
Ensure that the mains power, uplink, robot and optionally EtherCAT are connected to the ports labelled in the image. Unless you want to use it for remote management, you can ignore IPMI. This IPC has no rocker switch.
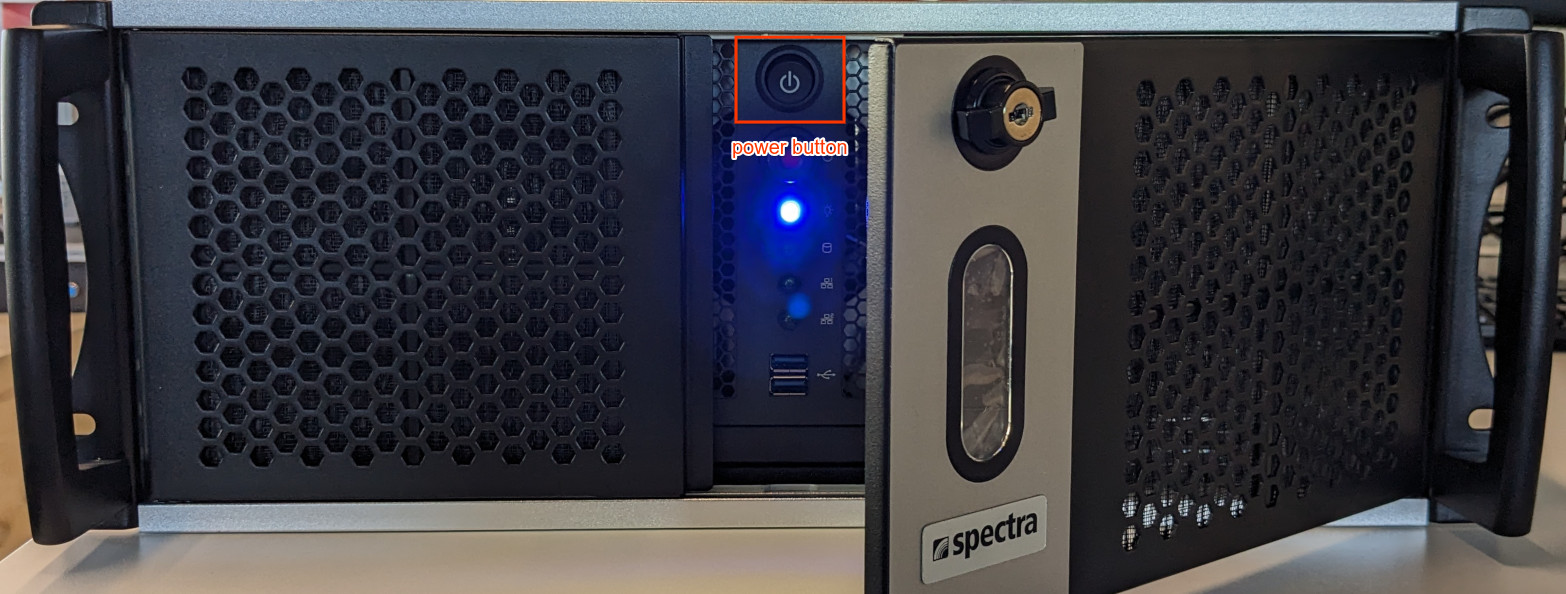
The power button is at the front, once the panel is opened:
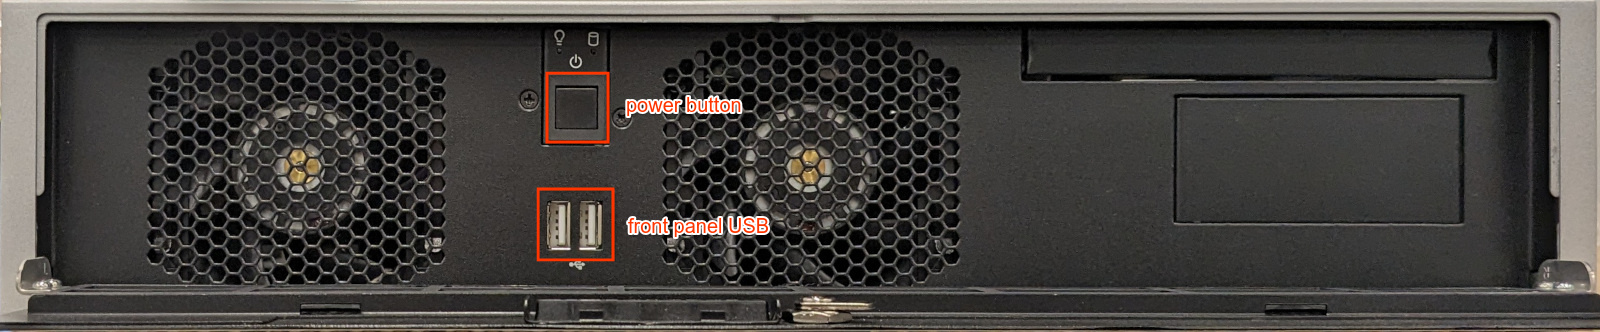
After connecting, power on the IPC.
Tier 2 IPC from Spectra
The back connectors of the Tier 2 IPC should be connected as follows:
Ensure that the mains power, uplink, robot and optionally EtherCAT are connected to the ports labelled in the image.
The power button is at the front, once the panel is opened:
After connecting, power on the IPC.
Tier 3 compute rack from Intrinsic
The ethernet connectors of the Tier 3 compute rack should be connected as follows:
- Green cable: Uplink to the Internet
- Yellow cable: Non-EtherCAT robot connection
- Orange cable: Optional, EtherCAT connection
- Blue cable: Optional, internal network of the Intrinsic hardware
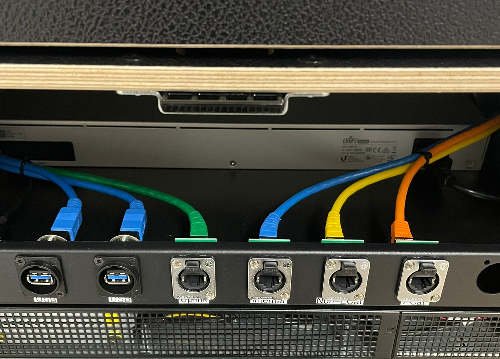
You can ignore the HDMI and USB connectors if your hardware has them.
Ensure that the power cable is connected to mains power:
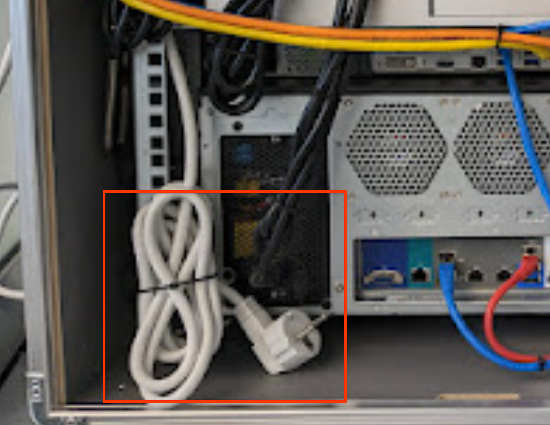
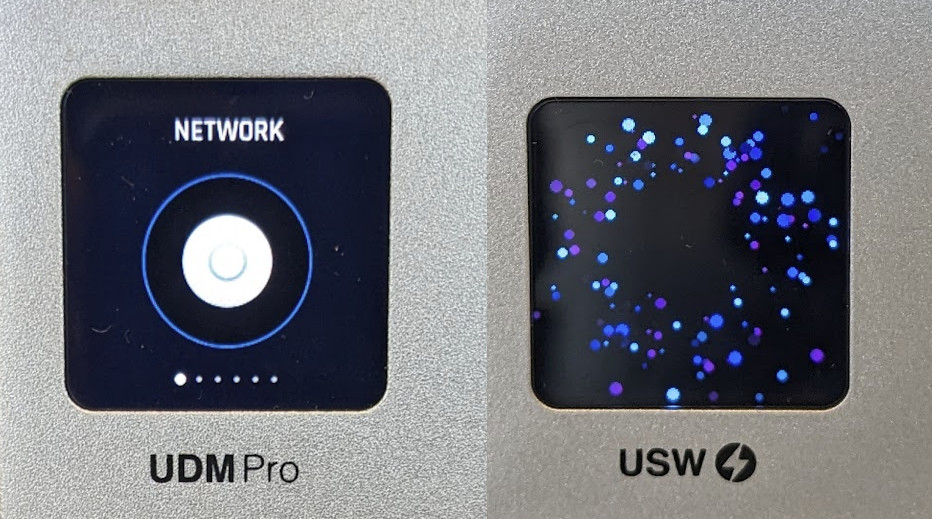
The Tier 3 compute rack from Intrinsic uses a UniFi UDM Pro. When properly powered and connected, it shows one of the following displays:
After connecting, power on the IPCs.
Power on
-
Validate that the rocker switch in the rear of the rack is in the correct position. The side labelled — should be pressed (not the ○).
-
If the BIOS is correctly configured, it should power on immediately. If not you may need to press the power buttons on the front of the IPC(s).
- If you hear the fans and see various LEDs light on the front of the IPC, it has been powered on.
After powering on the IPCs, set up the firewall or, if your firewall allows all outbound traffic, skip to Install and register your IPC.
Power off
Intrinsic recommends that IPCs stay running so that they receive security updates when needed.
If you need to power off the IPC(s), Intrinsic recommends pressing the power button(s) once and then waiting until the system has fully shut down (no activity or power LEDs active, which can take up to two minutes) before disconnecting mains power. This avoids losing recent changes.
Unexpected power loss
In the event of unexpected power loss, the IPC and solution are configured to restart automatically once power is restored. To ensure the IPC starts automatically after power is restored, you need to configure the "Restore on AC/Power Loss" or a similar setting in the IPC's BIOS. This setting is usually located in the power management or BIOS features section of the BIOS setup utility. Please refer to the IPC's specific BIOS documentation for the exact location and name of this setting.
After the IPC restarts, you may need to clear faults in the Service Manager, select Scene > Discard Changes then Execute > Reset to initial and restart the behavior tree, or perform an equivalent action in an HMI.
Firewall configuration
You can skip this section if your firewall allows all outbound traffic. If the firewall restricts outbound network traffic, consult with an IT representative to ensure that outbound traffic is allowed from the system on the following ports.
If you are using a UDM Pro, it is not possible to predict which ports or hosts will be used for connectivity testing, as these vary from location to location. Instead, you should consult with your IT admin to review the firewall logs and open the ports that the UDM Pro uses on first start. Example (may vary in your location):
- TCP ports 80, 3478, 6789, 8050, 8080, 8083, 8443, 8843, 8880, 8883
- UDP ports 3478, 5060, 5061
By Port and Host
- For HTTPS: TCP port 443
- edge.intrinsic.ai
- For DNS: UDP port 53 (only if no local DNS server is provided by DHCP)
- 8.8.8.8
- 8.8.4.4
- For NTP: UDP port 123 (only if no local NTP server is provided by DHCP)
- time.google.com
WebRTC
While the previous section is mandatory, WebRTC provides an optional link to optimize communication between the IPC and your Browser. By lowering latency, WebRTC enables more responsive animations and feedback during operations such as robot jogging. This reduced delay helps prevent positional overshooting by providing immediate visual data. If a WebRTC connection cannot be established due to network constraints, the system gracefully uses a higher latency connection to ensure the link remains active.
This low latency operation mode can be established in different ways. This list is in order of preference:
- P2P: This requires the client (browser) to reach the IPC on port 32666.
- STUN: This uses
stun.l.google.comUDP 19302, and generally requires outgoing UDP to arbitrary IP and ports. - TURN: To use regional relays, intrinsic TURN servers need to be reachable.
- Hosts resolved via turn.global.flowstate.intrinsic.ai:
- turn.flowstate.intrinsic.ai
- turn.europe-west1.flowstate.intrinsic.ai
- turn.asia-southeast1.flowstate.intrinsic.ai
- Ports
- TCP and UDP: 443
- UDP: 49152-49552
- Hosts resolved via turn.global.flowstate.intrinsic.ai:
What's next
-
If this is a new IPC from a vendor, you need to install and register your IPC.
-
If this IPC was already set up by Intrinsic or a solution builder, you can execute a solution on hardware.