Install and register your IPC
This guide shows you how to install the IntrinsicOS on one or more industrial PCs (IPCs) and configure the IPC so that you can use it and the Intrinsic platform to interact with your robot.
If you prefer CLI, use the inctl driven flow.
Prerequisites
-
Physical access to the industrial PC(s)
-
A monitor and a keyboard to run the installer and potentially configure the BIOS
-
One USB drive with at least 4 GB capacity (the SanDisk Extreme PRO works well)
-
Connect the IPC to a network that provides DHCP and allows access to the internet (port 443) by default
-
A computer with access to https://flowstate.intrinsic.ai/
Flowstate doesn't support multiple robots in a single hardware workcell. Contact your Account Executive if you need this.
Prepare install medium
-
Download the 20241114.RC12 OS install image. Using older install images will be slower.
-
Flash the image to the USB drive with Etcher, the Chromebook Recovery Utility's "local image" option, or a similar tool. We've seen problems when people use Rufus or Ventoy.
Connect display and keyboard
For the display connection, you need a display with a corresponding cable, usually DisplayPort.
- If your IPC does not have a graphic card (GPU), connect the display cable to the mainboard display connector.
- If your IPC has a GPU, then try connecting the display cable to the mainboard display connector first. If this does not work, connect the display cable to one of the GPU display connectors.
Reboot after connecting the display because hot-plugging may not work.
Connect the keyboard to one of the available USB connectors.
Configure the BIOS
The following BIOS changes are needed to enable disk encryption and to recover from power loss.
-
Power on (or reboot) the machine. During boot, press
Deleterepeatedly to enter the BIOS. -
Select your hardware vendor in the following table, and ensure the options are set. Some may already be set by default.
- Generic
- Advantech
- Spectra
Check the options above to see if this page has specific instructions for your hardware vendor.
- Disable Hyper-Threading on all realtime PCs (IPCs that will be connected to a robot).
- Ensure that a TPM or Security Device (whether using PTT, Firmware, or Discrete) is enabled.
- Ensure that "Restore Power" is enabled (whether set to Power on, S0, or Last state).
- under
Advanced- under
Trusted Computing, enable the TPM - under
CPU Configuration:- disable
Hyper-Threading - (if present) enable
AVX
- disable
- under
- under
Chipset > PCH IO Config- set
Restore Power on AC LosstoLast state
- set
- under
Advanced- under
CPU Configuration:- disable
Hyper-Threading
- disable
- under
PCH-FW Configuration- set
TPM Device SelectiontoPTT
- set
- under
APM Configuration- set
Restore Power on AC LosstoS0 State
- set
- under
-
Press F4 to save and exit.
Install the OS
-
If you haven't already, connect a display and keyboard to the machine.
-
Plug the USB drive with the install image into an available USB port.
-
Boot machine from USB (potentially enter BIOS boot menu to pick correct device).
-
When prompted for whether you want to install secure boot keys select
N.Install secure boot keys? (y/N)
-
If asked which device to install to input a device path and press
[Enter]. When/dev/nvme0n1exists, input/dev/nvme0n1and press[Enter]. Otherwise, the best disk for the OS is the smaller internal disk, leaving a larger removable disk for logging.Name Model /dev/sda SQF-S25M8-256G-S /dev/sdb ST1000NX0313 Enter the destination device (e.g. /dev/nvme0n1 or /dev/sdb)
-
The system will automatically restart after the previous step is done. If you do not see a QR code afterwards, try to:
-
If the system does not boot, starts the wrong OS, or enters the UEFI
Shell>, enter the BIOS again to set the newly installed OS as first entry in the boot order. -
If you see
Install secure boot keys?a second time, pressCtrl+Alt+Delto reboot again and remove the USB drive when the screen goes black.
-
-
-
After the system successfully rebooted into the installed OS you will see a QR code and a
Registration Code. Write down the registration code. It is required later.Registration code: e245d4909306
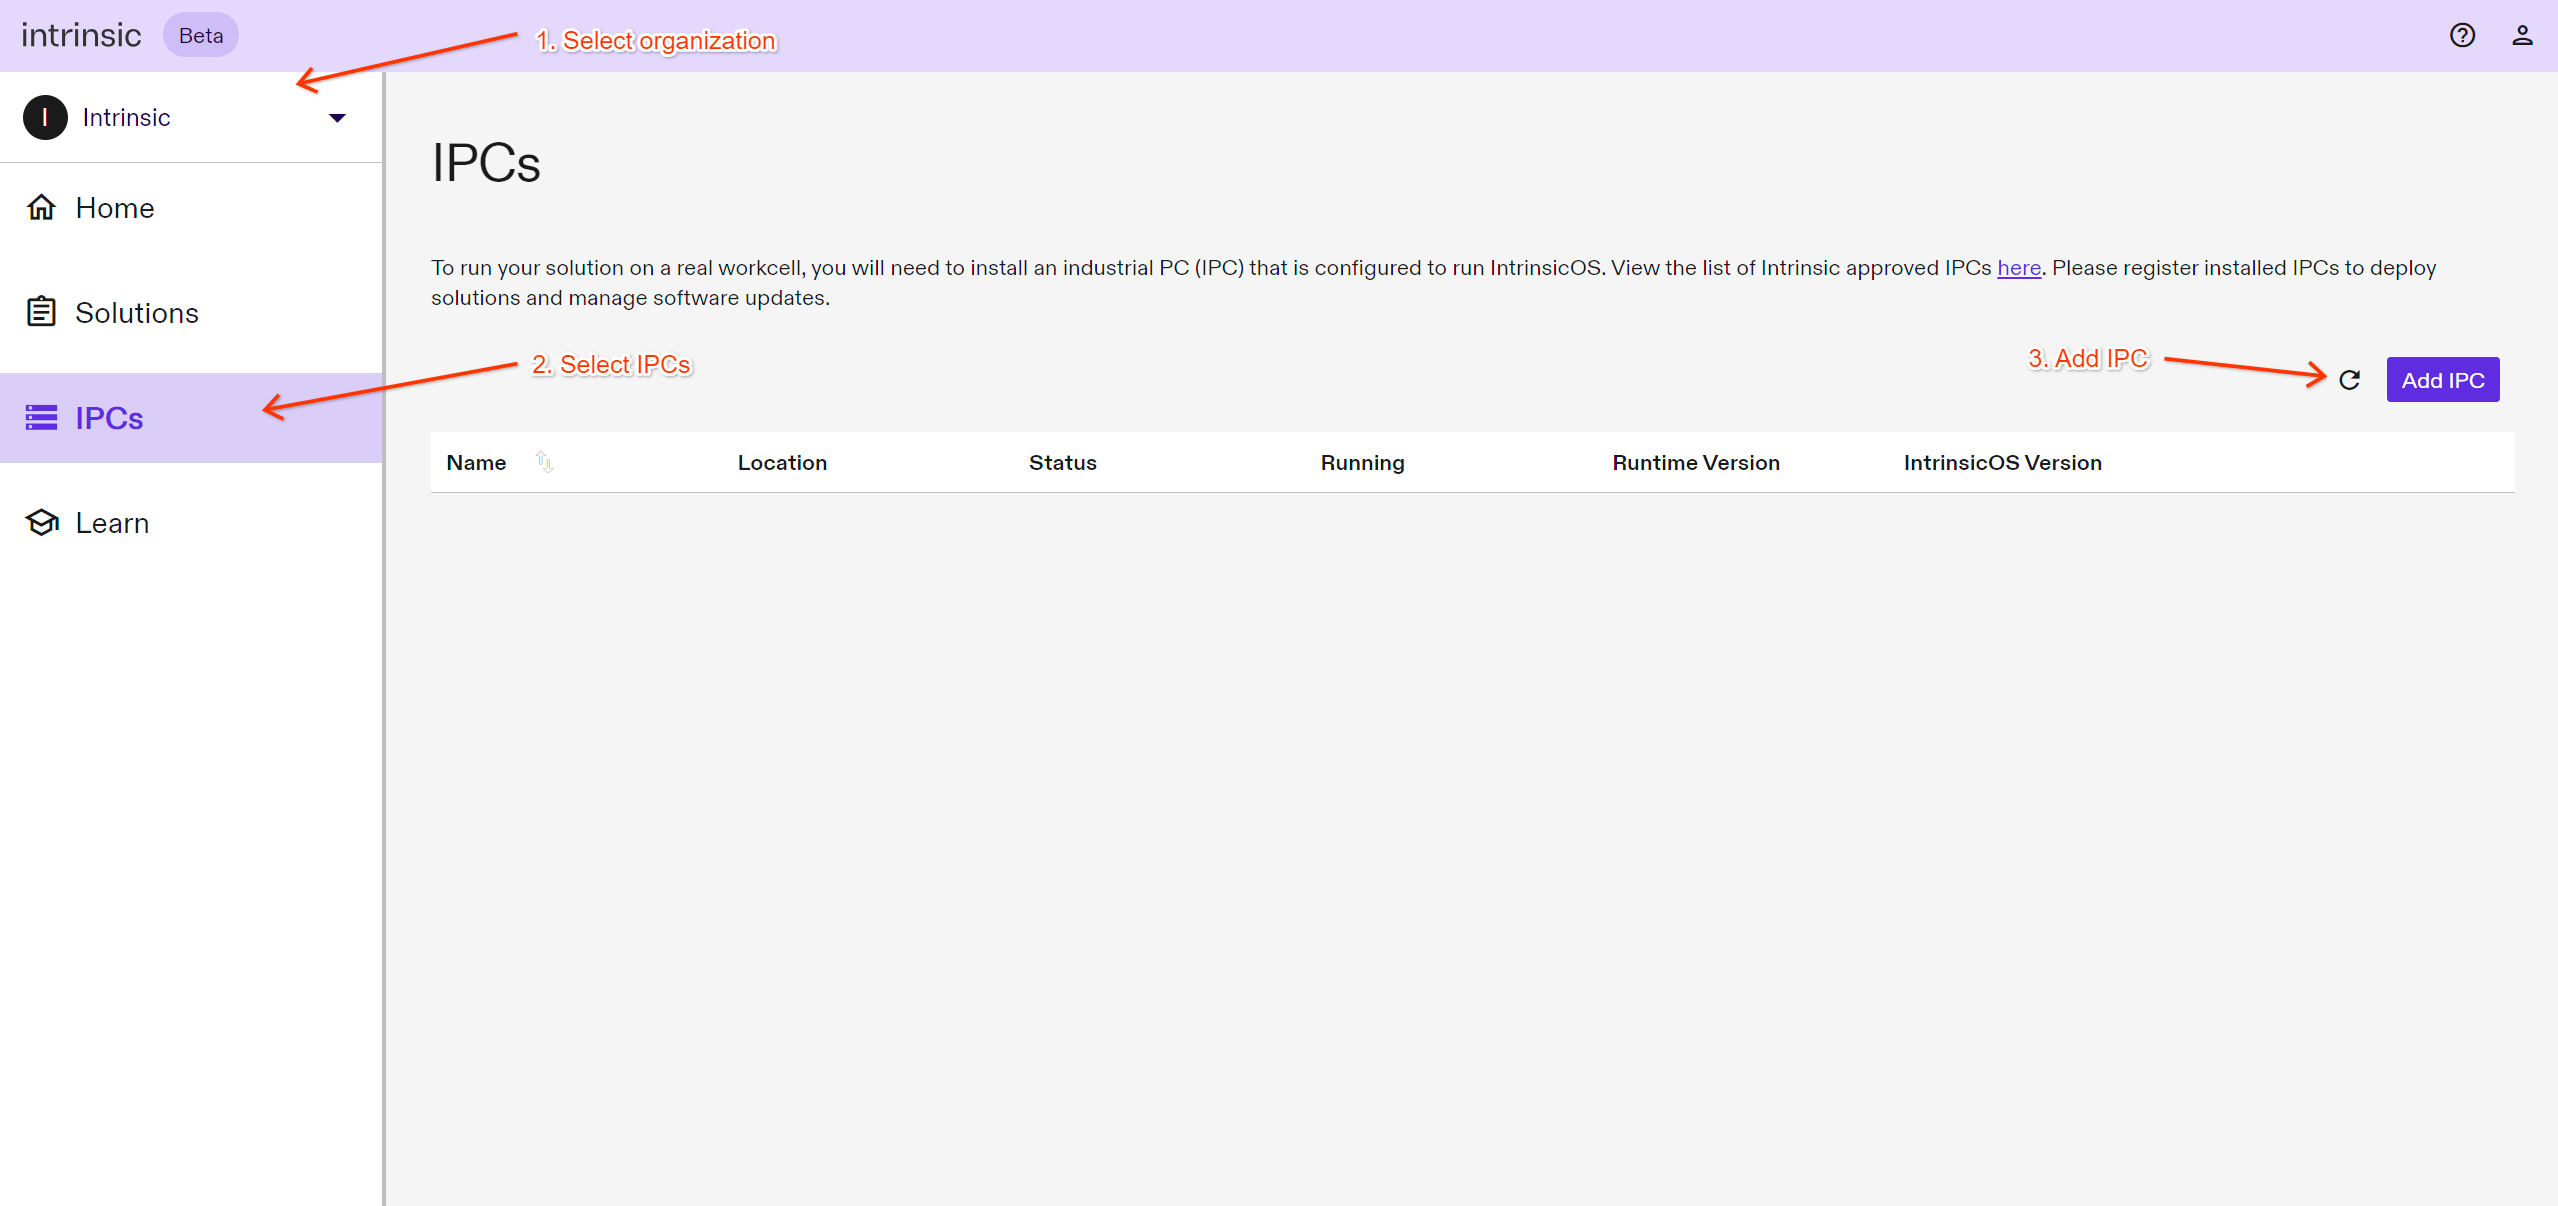
Register IPC
- Make sure you have selected the correct organization in the organization selector in the top left.
- To register the IPC for your organization, click IPCs on the left sidebar to open the IPC manager.
- Click Add IPC on the top right, and fill in the required fields.
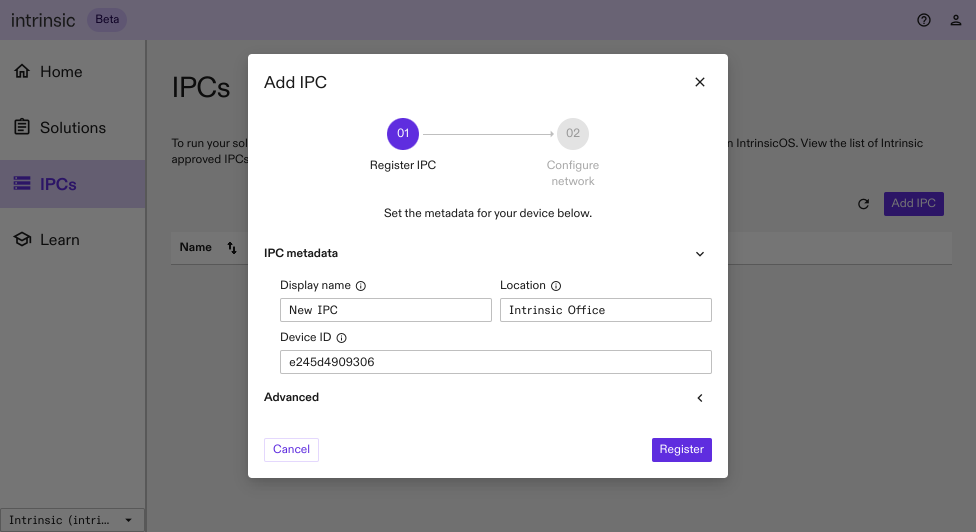
When you press Register, the dialog will show a loading bar, until the IPC is ready for further configuration.
If the device does not reboot within 10 minutes, or if you see "does not exist" errors for more than 15 minutes, try the troubleshooting steps.
On a fast network connection, it takes around 10 minutes for the IPC to add and update itself. On slower network connections, this may take up to an hour.
Configure networking
After adding the IPC you need to configure the network to allow communication with a real robot. The network configuration dialog will be shown automatically. You can also access it via the overflow menu (⋮) on the right and selecting Configure network.
For most configurations, you only need to configure the realtime communication interfaces connected to the robot. If you followed our guide for connecting the IPC, the dialog should show one "Connected" interface (with a globe) and another one that's "Not configured". If you see one or more "Disconnected" interfaces, ignore them.

If you do not see exactly one interface which is "Not configured" make sure all of the following are met:
- the IPC is connected to the internet via one interface
- connected to the robot with a different interface
- not connected to anything on other interfaces
- link lights on the robot are blinking
Then close and re-open the dialog to update it.
Use the correct tab for the type of connection you want to configure.
- IP Based
- EtherCAT
Robots like the UR, FANUC, or Kuka use IP-based realtime networking.
Expand the interface marked "Not configured" and configure it for "Ethernet for real-time and robot connections".
If you've followed our guide, the IP should be 192.170.10.123/24.
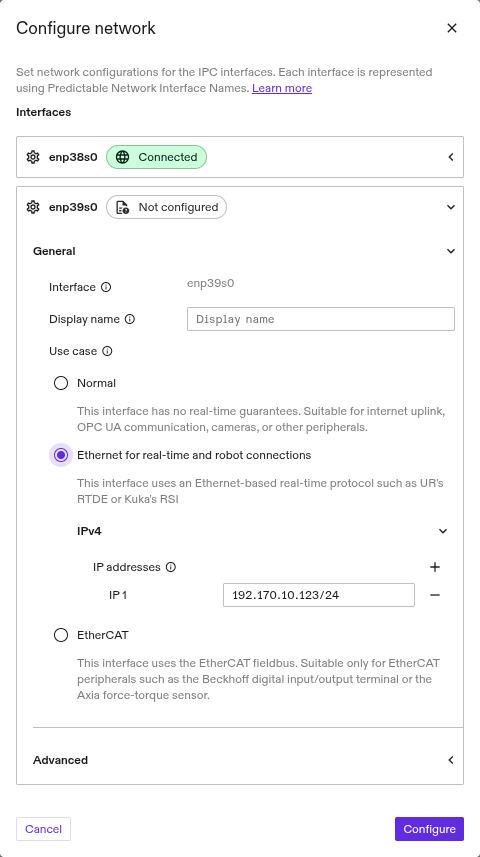
Press the Configure button. Once the dialog shows "Network configured", the device can communicate with the robot.
Expand the interface marked "Not configured" and configure it for "EtherCAT". If "EtherCAT" is disabled, this interface doesn't support EtherCAT, so identify another interface that supports EtherCAT and swap the cable over to it. You should then see the chosen interface enter the "Not configured" state.
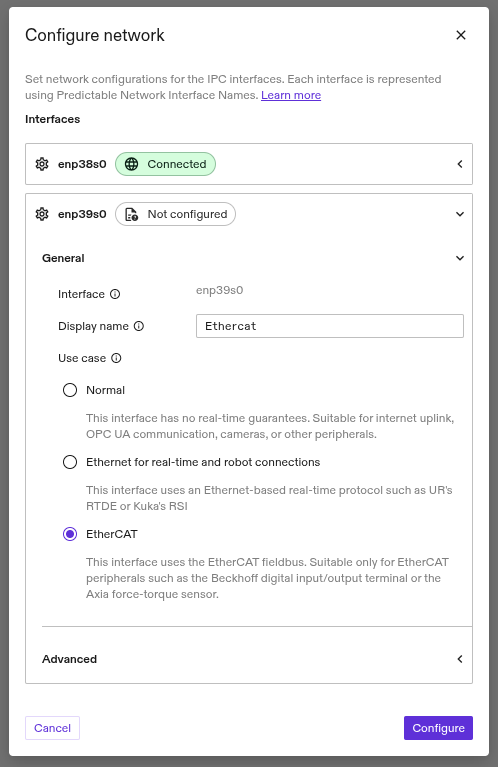
Press the Configure button. Once the dialog shows "Network configured". Make sure to follow the EtherCAT setup guide to make sure the solution properly uses the interface.
Troubleshooting
Most registration or configuration problems occur when the IPC can't reliably connect to Intrinsic's cloud servers. To debug this, ensure you have a monitor and keyboard attached.
- First, press
Ctrl+Alt+F3and check for any errors on the left sidebar.- If it says "Status: OK", this means it can reach Intrinsic's cloud servers, but it's still possible that other problems such as a slow connection can prevent setup.
- Press
Ctrl+Alt+F7to see the system logs. Disconnect and reconnect the LAN cable. You should see a lineDHCPv4 address ...within a few seconds.- If you don't see
DHCPv4 address ..., check that the device is connected to a network with a DHCP server as described in the networking guide.
- If you don't see
- If you're having trouble with the registration step:
- Press
Ctrl+Alt+F7, then wait for 60s until you see the lineFinished xfa-advertise.service.- If you see
StatusCode(404), check that you're using the right device ID or registration code. - If you see an error referring to
failed to verify certificate, check the date and time (these can be changed in the BIOS). Also, check that your network doesn't have a transparent proxy, as this is not supported. Your IT department may be able to disable the transparent proxy to fix this. - If you see another network error, check that the device has access to the internet as described in the networking guide.
- If you see
- Press
- If you're having trouble with network configuration:
- If you're trying to move the device from one network to another and the two networks require different configurations (eg DHCP vs static IP), use the local management interface instead.
- Press
Ctrl+Alt+F9. If you see a line withERROR, try rebooting the IPC and seeing if it recurs.
- If you still have a problem, contact our support
team, including photos
of the logs after pressing
Ctrl+Alt+F3,Ctrl+Alt+F7andCtrl+Alt+F9.
Next steps
Congratulations. You are done with the IPC setup. Continue with executing a solution on the new IPC.