Run on hardware
For seamless execution of your solutions, acquiring appropriate hardware, particularly an industrial PC (IPC), is crucial. This guide covers multiple aspects: setting up dedicated hardware for deploying your solutions, a purchasing guide for IPCs, IPC setup instructions, and guides for initiating robots from various manufacturers. The following section provides a high-level overview, prerequisites, and step-by-step instructions for establishing a robot workcell using the Intrinsic stack.
This guide does not include guidance on safety. Set up adequate safety systems and conduct all risk assessments before deploying to real hardware.
System overview
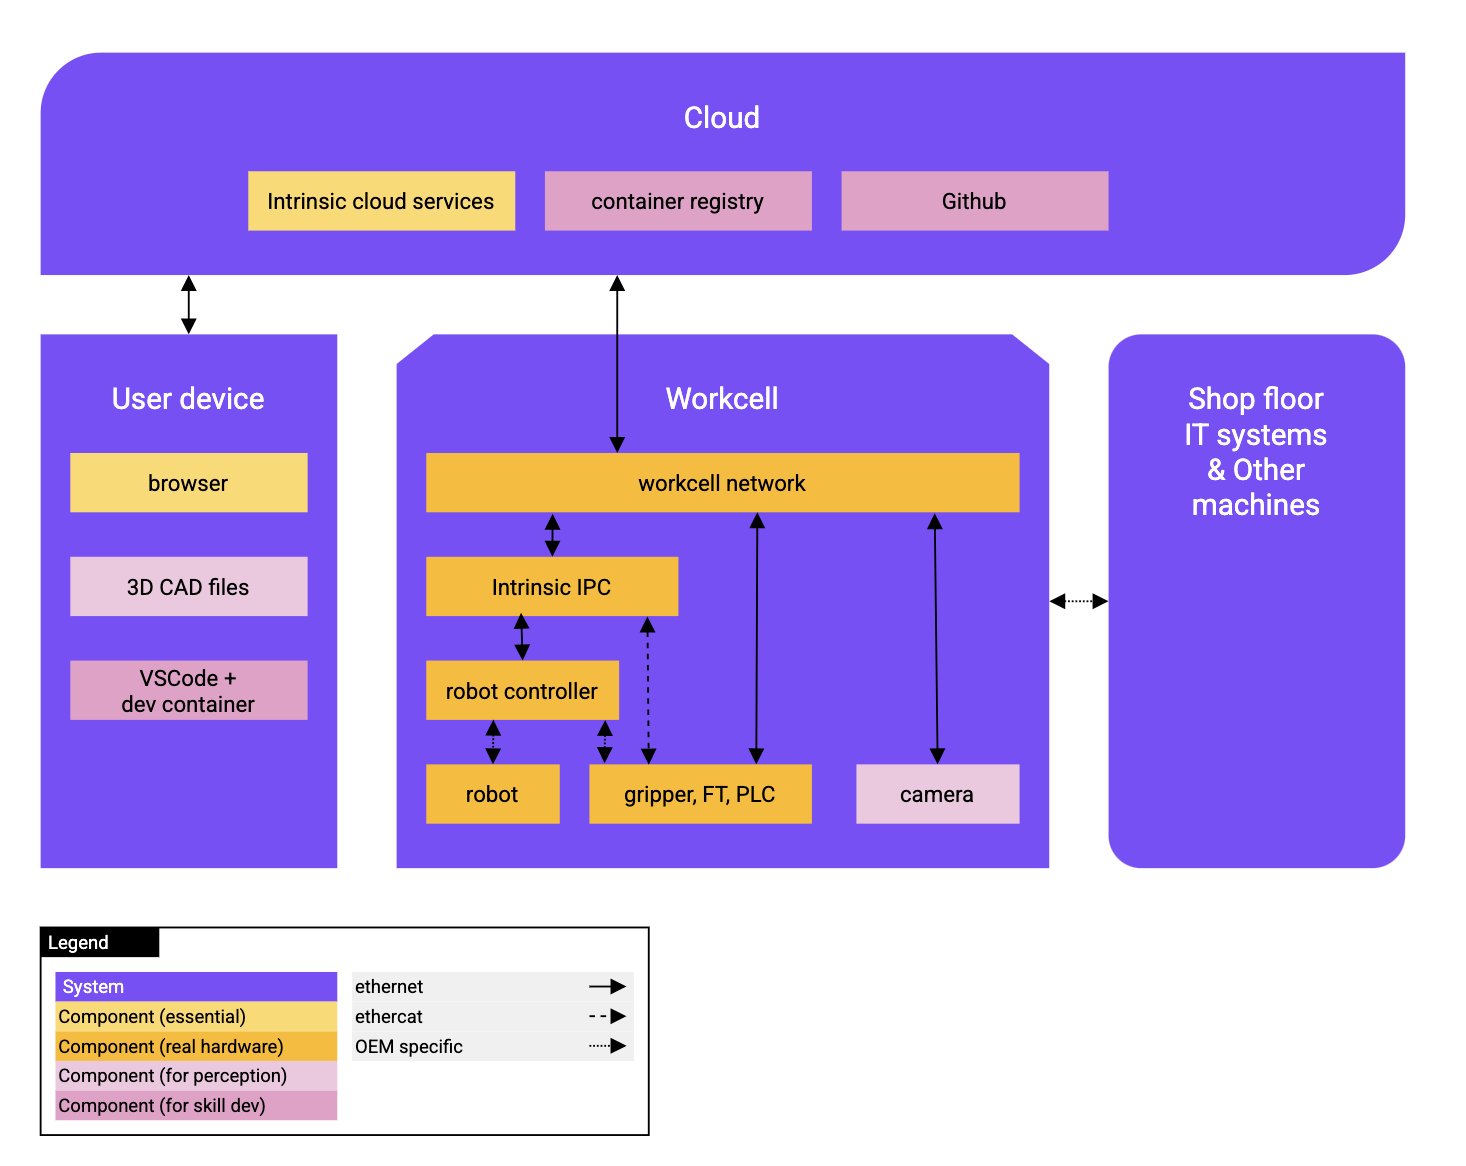
This diagram shows the required components of a Flowstate deployment. Depending on the use case, only a subset of these components is needed.
On a high level, a Flowstate deployment assumes the existence of four systems:
- The actual robot workcell, consisting (at least) of an Intrinsic-powered IPC which is connected to the automation hardware. A typical workcell might include a robot controller and robot, a gripper, a camera, a PLC, and other devices.
- A user device, such as a laptop or workstation running Windows or Linux.
- Various (Intrinsic) cloud services.
- Optionally, other (standalone) machines or shop floor IT systems such as a manufacturing execution system.
At its core, the Intrinsic stack assumes that both the user device as well as the workcell are independently connected to the internet.
The Intrinsic stack can be used in different stages of a project:
- For Step 1, you only need a registered Flowstate account and a laptop with a browser to author a solution in simulation in the cloud.
- For Step 2 and Step 3, you need a physical workcell to realize this solution on real hardware. This workcell may for example consist of a local network, an Intrinsic IPC, a robot controller plus robot, a gripper, force-torque sensor, PLC and a camera.
- For Step 4, in order to make use of computer vision / perception, you need CAD models of the work pieces of interest, as well as a camera in the real workcell.
- For Step 5, to develop custom skills, the user needs a way to run our dev container, either locally or in the cloud (for example on Github codespaces). Furthermore, the user needs a container registry and (optionally, but recommended) a code repository for storage and collaboration.
Step 1: Getting started
To familiarize yourself with Flowstate and the Intrinsic stack, you only need a Flowstate account and a web browser.
- Acquire a Flowstate license.
- Reach out to your Account Executive or info@intrinsic.ai to get a Flowstate account.
- Have a laptop or workstation ready with a fast internet connection (>50 MBps).
- Explore the tutorials section, in particular the pick-and-place tutorial. Going through the tutorial will take you approximately 4-8 hours.
- Think about an automation problem that you want to solve using Flowstate (for example, a pick-and-place or machine tending task).
- Obtain CAD models of the relevant workpiece(s) and workcell layout. Flowstate supports the following file formats: STP/STL/OBJ+MTL/DAE/GLB.
- Author a solution for your automation problem and run it in simulation.
Step 2: Set up (minimal) robot workcell
As a next step, you may want to transfer your digital model of your workcell to real hardware. To understand the required components, take a look at the system overview diagram at the top of this page.
- Set up the (physical) robot.
- Buy a robot that is supported by Flowstate. Reach out to your account executive to verify that the robot manufacturer and model is supported.
- Check the prerequisites for your robot type: FANUC, KUKA, or Universal Robots.
- Make sure that safety is configured and enabled. For example, this can be realized through a light curtain or safety gate to disable the robot.
- Make sure you can move the robot through the physical teach pendant.
- Make sure that the robot is payload calibrated.
- Set up workcell network.
- Set up a workcell network which is connected to the internet and to which you can later connect your IPC and peripherals to. We recommend a wireless router so that you can later access the workcell locally from your laptop, although a tethered connection will work equally fine. Also make sure that you have DHCP enabled. For more details, check the IPC network setup.
- Depending on your choice of peripherals, you might need a PoE capable router or standalone PoE injectors to power your peripherals.
- Enable a DHCP server for IPv4 on the local network.
- Make sure your uplink has at least 50 MBps internet bandwidth both upstream and downstream. For example, connect your laptop to the workcell network and navigate to https://www.speedtest.net/ to measure your internet speed.
- Make sure that the TCP and UDP ports listed in the network configuration guide are open for outgoing connections.
- Make sure that large downloads (~1GB) are not blocked by your company firewall. Later, the workcell needs to download several large docker images. You can test this by downloading the OS installer to your laptop. This also gives you an additional indication on how fast and stable your internet connection is.
- Set up a dev container,
either locally or on Github codespaces. In particular, for the local
environment consider these two hints:
- Install Docker on your computer. If you are a Windows user, make sure that Hyper-V is enabled.
- Set up a local development environment. If you are a Windows user, make sure that the path to our code does not contain spaces.
- Set up the industrial PC.
- Buy an Intrinsic-approved IPC.
- Set up the IPC by flashing IntrinsicOS on it.
- Make sure you can deploy your solution
- Set up the robot in Flowstate. Follow the corresponding instructions, for example for KUKA or FANUC or Universal robots (UR) robots.
- Set suitable application limits for the robot in Flowstate by adjusting the
joint position range, velocity and acceleration: Select the robot and then
in the settings panel select
Update application limits. - Add 3D models for the dress pack to avoid self collisions. Ask your CSE lead for help.
- Verify that the robot is kinematically calibrated, that is, make sure that the per-joint calibration (obtained from factory calibration performed by the ROEM) is set correctly in the ICON configuration. For some robot brands (UR and KUKA) this happens automatically. For other ROEMs, ask your CSE lead for help.
- Jog the robot using Flowstate. Be careful not to bump into objects as jogging does not consider collisions.
- Perform robot-to-workcell calibration, that is, calibrate (=position) the robot accurately in the digital twin. Ask your CSE lead for help. If your workcell setup includes a gripper or custom end-of-arm tooling, you might want to postpone the robot-to-workcell calibration until you have successfully installed the end-of-arm tools.
Step 3: Add other equipment
If your workcell includes additional automation hardware such as grippers, force-torque sensors, buttons and lights.
-
Set up the gripper in Flowstate (if needed).
- Buy a gripper / end-of-arm tool that is supported by Flowstate. Reach out to your account executive to verify that the robot manufacturer and model is supported.
- Add the gripper asset to your solution in Flowstate and configure it.
- Robotiq grippers: Connect the gripper to the workcell network, add
the
Robotiq Hand-E Adaptive Gripperto your solution, then configure its IP address to match its address on the workcell network. Reach out to your CSE lead if you need more information - OPC-UA based grippers
- Robotiq grippers: Connect the gripper to the workcell network, add
the
- Install the following skills in your solution:
enable_gripper,control_adaptive_pinch_gripper. You can do this in the process panel by adding a new skill using the search bar in the skill menu.
-
Set up the Force-Torque sensor in Flowstate (if needed).
- Buy a Force-Torque sensor that is compatible with Flowstate. Reach out to your account executive to verify that the robot manufacturer and model is supported.
- Add the corresponding asset to your solution in Flowstate and configure
it.
- Follow the setup instructions for ATI Axia80 and Omega191 which are force-torque sensors that can be connected using EtherCAT to the IPC.
-
Set up additional peripherals in Flowstate (if needed).
Reach out to your account executive to verify that the robot manufacturer and model is supported.
Options include:
- Beckhoff EK1100 EtherCAT coupler provides a way to read digital and analog inputs and write digital outputs.
- OPC-UA based equipment. Ask your CSE lead for help.
- Equipment connected to digital IOs on the robot controller. Ask your CSE
lead for help.
- Using custom IOs with KUKA robots.
Step 4: Add camera
Follow these steps to add one or more cameras to your workcell. This lets you use vision-based pose correction and pose estimation.
- Buy a camera that is supported by Flowstate. Reach out to your account executive to verify that the robot manufacturer and model is supported.
- Buy a lens suitable for your use-case. See here for more information.
- Connect the camera to the workcell network and make sure it has power (either using a dedicated power supply or using PoE).
- Make sure that the camera works using the tools provided by the camera manufacturer.
- Set up the camera in Flowstate.
- Install the following skills to your solution (otherwise some UI elements
such as the camera calibration wizard won't work):
move_robot,update_robot_joint_positions,estimate_and_update_pose,sample_calibration_poses,collect_calibration_data,calibrate_hand_eye,enable_motion. - Buy a suitable Charuco calibration board for your application. Make sure to
select
pattern: coarseandmaterial: aluminium/LDPE.- 200x150 board: This corresponds to the charuco_9x12_15mm / charuco_9x12_15mm_estimator in Flowstate (needed in the next step).
- 300x200 board
- 400x300 board
- 600x400 board
- Add the following assets to your solution. Only one calibration board is
supported for self-service. If you need a different
calibration board, ask your CSE lead to enable them for you.
- charuco_9x12_15mm (family: calibration). This is the calibration board, corresponding to the 200x150 board sold by calib.io (see step above).
- charuco_9x12_15mm_estimator (family: perception_model). This is the pose estimator for the 200x150 calibration board sold by calib.io (see step above).
- Obtain suitable 3D models of your workpiece(s). Note that your models should be textured and have material properties. The higher the visual fidelity of the models, the better the results of Intrinsic's pose estimator. Flowstate supports the following file formats: STP/STL/OBJ+MTL/DAE/GLB.
- Train pose estimators following the guide. For training ML-based pose estimators, ask your CSE lead for help.
Step 5: Develop custom skills
In case that you want to develop custom skills, you need a developer PC running VSCode and Docker.
- Create a Github user account. The free tier option is sufficient.
- Install Docker on your computer. If you are a Windows user, make sure that Hyper-V is enabled.
- Set up a local development environment. If you are a Windows user, make sure that the path to our code does not contain spaces.
- Follow the skill development guide to install the skill.