ABB Externally Guided Motion (EGM) setup
Intrinsic Flowstate supports ABB robots using the OmniCore controller via the Externally Guided Motion (EGM) and Robot Web Services (RWS) interfaces. This guide walks through setting up your ABB controller and Flowstate solution to use ABB robots.
This guide does not include guidance on safety. Set up adequate safety systems and conduct all risk assessments before deploying to real hardware.
Prerequisites
Here are the prerequisites for setting up an ABB robot with Intrinsic Flowstate:
- Basic knowledge about Intrinsic Flowstate
- An Intrinsic IPC
- Basic knowledge about ABB Robots and Omnicore controllers
- A Windows PC for one-time installation
- A 6-axis ABB robot with an Omnicore robot controller equipped with the EGM option (see note below on version information.)
The following guide was tested with an OmniCore controller running RobotWare 7.18, EGM option 3124-1 and StateMachine Add-in 2.0.0
The Omnicore controllers do not ship with EGM enabled by default. This is a non-standard option that must be explicitly selected. Contact your ABB sales representative for details.
Background
The Intrinsic hardware module uses two communication interfaces to interact with the ABB controller.
-
Robot Web Services 2.0 (RWS)
Robot Web Services (RWS) is a REST API giving remote access to a large set of possible operations on the ABB Controller. RWS is used for task-level operations such as starting and stopping programs, getting controller information and setting configurations. -
Externally Guided Motion (EGM)
EGM is ABB’s solution for adapting an ongoing motion from an external sensor or computer. EGM can run at rates up to 250Hz and communicates via UDP. EGM allows to stream position set points and feedforward velocities into the controller. This interface is used for motion execution and control of the robots. Note, however, that EGM does not provide hard realtime guarantees.
In order to facilitate external control of an ABB Robot using these interfaces, ABB has developed an add-in for OmniCore controllers called StateMachine. This add-in automatically creates ABB Rapid programs that handle communication and external motion control set up.
Setup Procedure
Step 1: Make sure the robot is connected and you can jog it with the teach pendant
Follow the instructions that came with your controller to connect it to the robot and verify that you can jog the robot.
Step 2: Configure your controller to enable “AUTO” operation mode
Depending on your exact controller version, this may require connecting an external e-stop button. Refer to the ABB controller manual for details on how to do this.
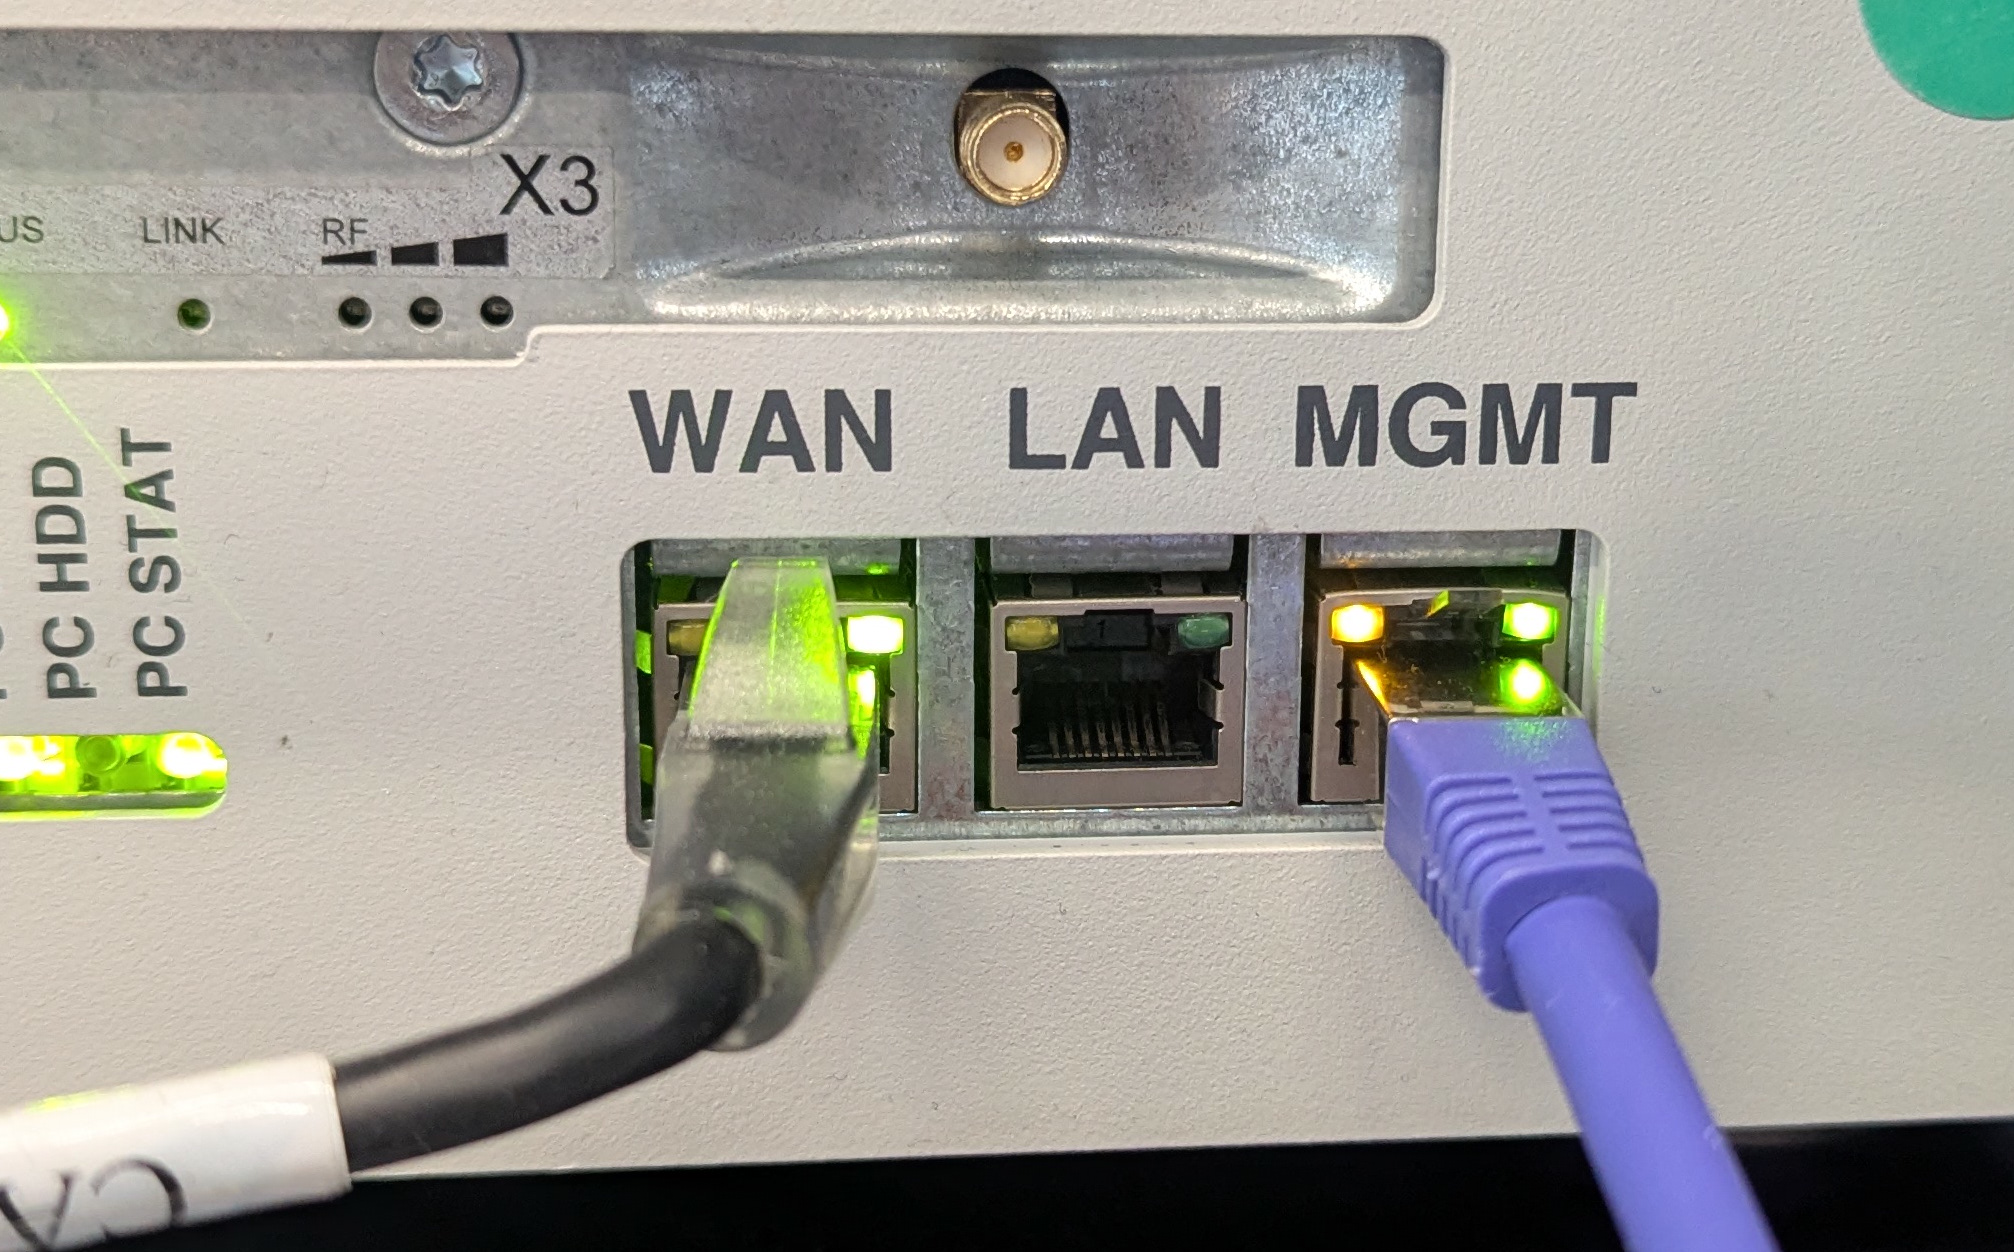
Step 3: Network wiring between Intrinsic IPC and ABB controller
Connect the controller to IPC's non-ethercat robot ethernet port via the WAN port (see image below) on the Omnicore controller. This is the network interface that was configured during IPC setup.
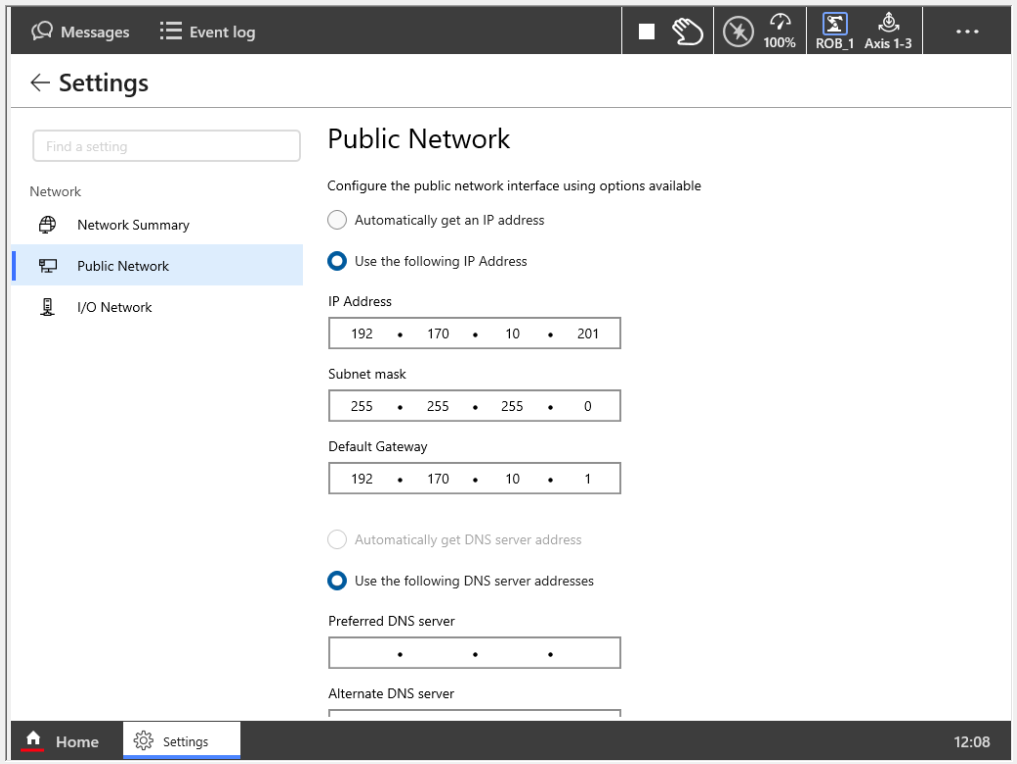
Open the network settings on the teach pendant ( Home -> Settings -> Network -> Public Network)
and set an IP and subnet for the robot. The controller should be on the same subnet
as the non-EtherCAT robot ethernet interface. Here we use a subnet mask of
255.255.255.0 and IP of 192.170.10.201:
Step 4: Connect to controller using RobotStudio
Connect the Windows PC with RobotStudio to the same network as the controller. This can be done via the MGMT port (see image in previous step).
On RobotStudio connect to the robot controller. This can be done by navigating
to the Controller tab and selecting Add Controller and selecting the discovered controller:
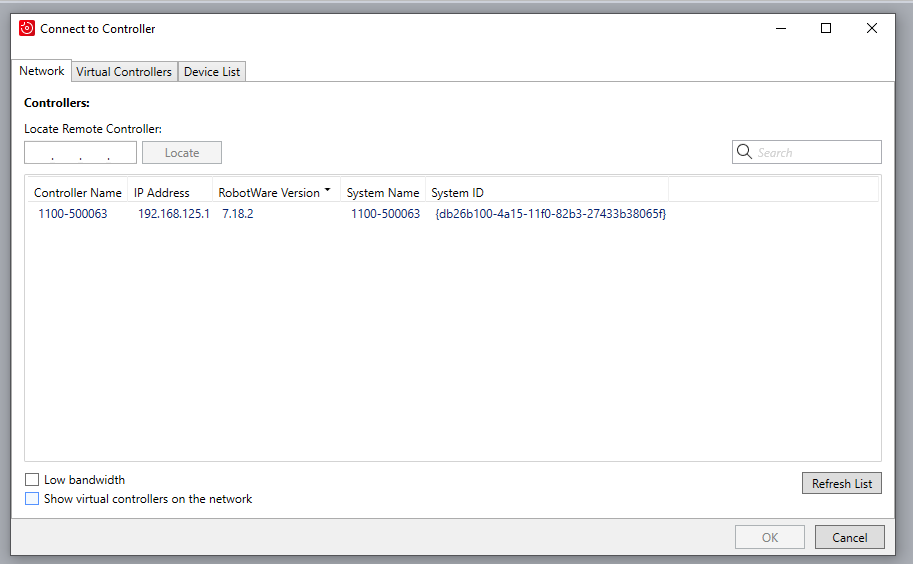
If the controller is not discoverable in RobotStudio, you may need to enable RobotStudio connectivity in the network settings on the teach pendant.
Step 5: Ensure EGM option and StateMachine Add-in are active
Once the physical controller has been discovered in RobotStudio, navigate to
Installation --> Modify Installation in the Controller tab.
Make sure to set the following options:
- In the Software tab, under Available, select StateMachine Add-in and press the include-button
- In the Options tab, under Engineering tools, select Externally Guided Motion, EGM
- Press Apply and reset to apply the customizations and restart the controller
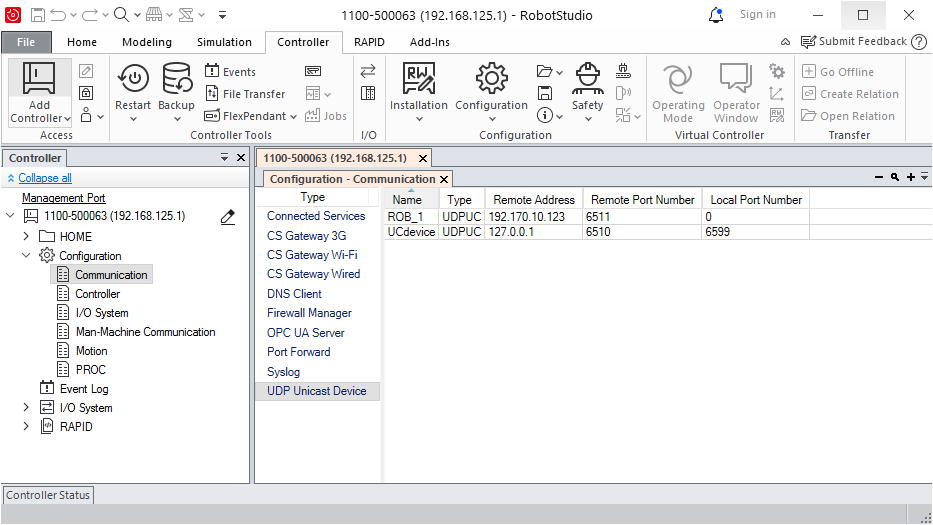
Step 6: Communication configuration on controller
- In the left sidebar, expand the Configuration list and double-click Communication
- In the Type column, double-click UDP Unicast Device
- Double-click on the ROB_1 entry
- Change the Remote Address to the IP-address of the IPC. This will typically be
192.170.10.123:
- Now in the Type column, double-click Firewall Manager
- Ensure that for
UDPUCtheEnable on Public Networkcolumn is set toYes.
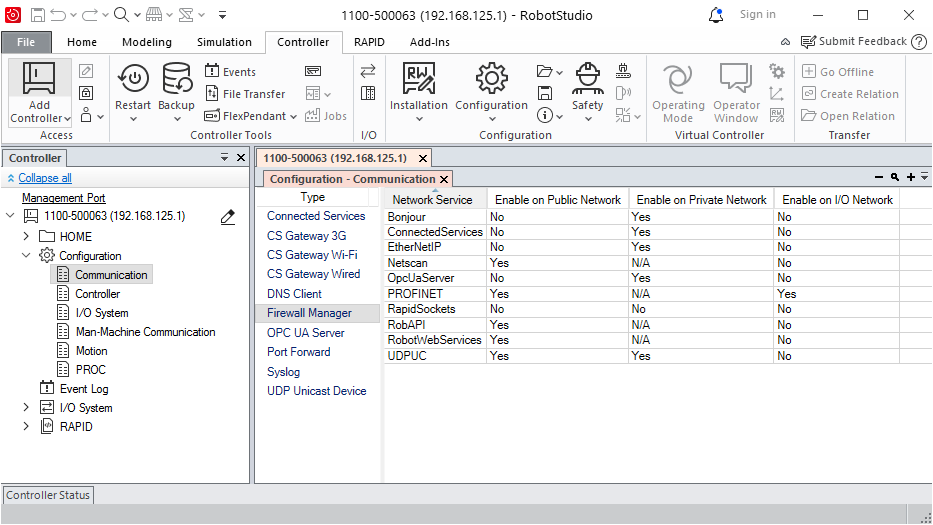
- Restart the controller
Step 7: Set robot in AUTO
Using the teach pendant, place the robot in AUTO-mode.
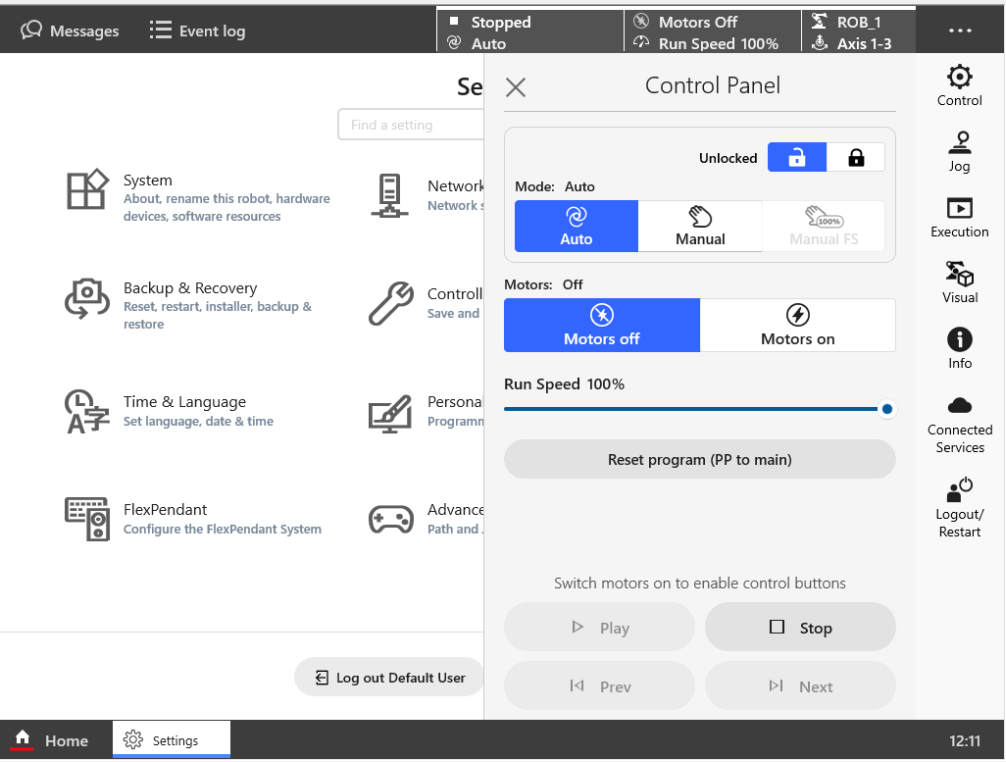 The robot is now ready for a connection from the ABB hardware module.
Step 8: Add ABB hardware module
Setup your solution adding a real-time control service and ABB hardware module asset.
For the hardware module asset choose the appropriate ABB hardware device such as the
ABB IRB 1100-4/0.58 Hardware Module, which includes the hardware driver and the
Flowstate scene object. For this to work with the preconfigured real-time
control service, use robot as the asset instance name. Additionally, for the
hardware module asset configuration set the robot_controller_ip parameter to
the IP configured in Step 3. In the case of this guide it was 192.170.10.201.
For the real-time control service, use the preconfigured ABB real-time control service
catalog service asset - it is compatible with the ABB hardware device assets.